How to Create, Customize, and Share List Views in Salesforce
A Practical Guide for Admins

List Views let you filter, sort, and display records exactly the way you need them without wading through pages of data that don’t apply to you. They are a way for users to quickly filter down to the records most relevant to them without having to run a full report. For example, a sales rep responsible for the West Coast wouldn’t want to scroll through accounts in New York or Singapore; they just want to see their region.

Some real-world use cases:
- A regional sales rep sees only accounts in their territory
- A SDR sees only their own open leads
- A sales manager sees all high-value opportunities closing this quarter
- A support agent sees only the cases assigned to them
In this guide, we’ll walk through everything: how to create a List View, how to customize it with the right columns, how to share it with your team, and other tips. By the end, you’ll have a skill you’ll use every single day.
What Is a Salesforce List View?
A List View is a saved, filtered display of records for a specific object such as Accounts, Contacts, Opportunities, Leads, or any custom object in your org. Think of it as a reusable window into your data.
Out of the box, Salesforce gives you a few standard List Views: ‘All Accounts’, ‘My Contacts’, ‘Recently Viewed Opportunities,’ but the real power comes when you build your own.
Instead of running a report every morning to see which leads came in this week, or scrolling through hundreds of accounts to find your channel partners, a custom List View shows your users exactly that subset of data with one click.

Unlike Salesforce Reports, which live in the Reports tab and require a bit more setup, List Views are right there on the object tab. They’re fast, visual, and actionable.
How to Create a Custom List View
Creating a List View takes about two minutes. Here’s how to do it in Lightning Experience:
- Navigate to the object tab where you want to create the view — for example, the Accounts tab.
- Click the List View Controls icon (the small gear/cog icon to the right of the search bar).
- Select New from the dropdown.
- Give your List View a name. Make it descriptive. Something like ‘Accounts Needing Attn Next Week’ or ‘High Priority.’
- Salesforce auto-populates the API name based on your list name, but you can edit it if needed. It must start with a letter, use only alphanumeric characters and underscores, and can’t end with an underscore or have two consecutive underscores.
- Choose who can see this List View (more on sharing options below).
- Click Save, then Save again.
![]()

At this point, your List View exists but shows all records with no filters. Next, you’ll narrow it down.
Adding and Editing Filters
Filters are what make a List View actually useful. Here’s how to add them:
- With your new List View open, click the Filter icon (funnel icon on the right side of the screen) to open the Filters panel.
- Click Add Filter.
- Choose a Field from the dropdown: for example, ‘Type’, ‘Owner’, ‘Created Date’, ‘Status’, etc.
- Select an Operator: ‘equals’, ‘contains’, ‘greater than’, etc.
- Enter the Value you want to filter by.
- Click Done, then Save.
You can stack multiple filters together. For example: show me all Accounts where Type = ‘Customer – Channel’ AND Billing State = ‘TX’. The result is a tightly scoped view of exactly the data you need. More on this here.
Filter Logic
By default, Salesforce applies AND logic to all your filters, meaning a record has to match every filter to show up. But sometimes you need more flexibility.
You can customize this by clicking Add Filter Logic in the Filters panel. For example:
- (1 AND 2) OR 3: show records that match both filters 1 and 2, OR records that match filter 3
- 1 AND (2 OR 3): match filter 1, and either filter 2 or 3
Note: If you add Filter Logic to a List View, inline editing will be disabled for that view. Filter Logic lets you customize how filters relate to each other using AND/OR conditions. For example, you might show records that match Filter 1 AND Filter 2, OR Filter 3.
While this makes filters more precise, it comes with a tradeoff: Salesforce disables inline editing on any list view that uses Filter Logic. This is a known Salesforce limitation.
If your team relies on quickly editing records directly from the list view, keep filters simple and stick to the default AND logic instead of adding custom filter conditions.
The ‘My Records’ Filter: A Favorite Admin Trick
One of the most powerful filter values in Salesforce is ‘My Records.’ it means the current logged-in user’s records. Instead of creating 10 separate List Views for 10 different reps, you can create one List View with an Owner filter set to ‘My Records’, and every user sees only their own data.
It’s clean, it scales, and it’s one of those admin tricks that makes you look brilliant with very little effort.
Customizing Your Columns
Once your filters are set, you’ll want to customize which fields appear as columns. By default, Salesforce shows a generic set of fields that may not be relevant to the purpose of your view. Here’s how to change them:
- Click the List View Controls icon (gear icon).
- Select ‘Select Fields to Display’.
- In the panel that opens, you’ll see Available Fields on the left and Visible Fields on the right.
- Move fields between columns using the arrows. You can also drag to reorder them.
- Click Save.

Note: think carefully about what fields your users actually need in this specific view. If the List View is for following up on hot leads, include ‘Last Activity Date’ and ‘Lead Source’, not a generic set of address fields they’ll never use. The more purposeful your columns, the more useful the view.
Sharing Your List View
When you first create a List View, you choose a visibility setting. You can always come back and change this. Here are your three options:
- Only I can see this list view: private to you. Great for personal work views.
- Share with groups of users: visible to specific public groups or roles. Perfect for team-specific views.
- All users can see this list view: visible to everyone in your org.
To update the sharing setting on an existing List View:
- Open the List View.
- Click the List View Controls icon (gear icon).
- Select Sharing Settings.
- Choose your visibility option and save.
Reminder on permissions: You can only share a List View if you have the Manage Public List Views permission. If the sharing option is greyed out, that’s why. More on that here.
Power Features You Might Not Be Using
Inline Editing
One of the most time-saving features of List Views is the ability to edit records directly from the list: no need to open each record individually. Hover over an editable field and you’ll see a pencil icon. Click it, make your change, and save. You can even select multiple records and update a field across all of them at once.
A few conditions for inline editing to work:
- The user must have Edit access to the record and the field.
- If your org uses Record Types on that object, your List View must be filtered by exactly one Record Type.
- Filter Logic must not be applied to the view.
- Not all fields support inline editing (formula fields and certain system fields are locked).
Pinning a List View
Every time you navigate to an object tab in Lightning Experience, Salesforce defaults to showing ‘Recently Viewed’, which is rarely what you want. The fix? Pin your List View.
With your preferred List View open, click the pin icon (the thumbtack to the left of the view name). That view is now your default for that object tab. No more clicking through to find your go-to view every morning.
Note: pinning is personal; each user can pin their own preferred view. Admins can’t force a pin on behalf of all users, but you can coach your team to do it themselves.
Favorites
Beyond pinning, you can also favorite a List View by clicking the star icon in the top right. Favorites act like browser bookmarks inside Salesforce: accessible from anywhere in the org via the Favorites menu in the navigation bar.
The difference: a pinned view is the default landing page for an object tab. A favorited view is a quick-access bookmark from anywhere. Both are worth using.
List View Charts
Did you know you can attach a chart to a List View? It’s one of those features that turns a plain data table into a mini dashboard; it’s pretty cool.
To add a chart:
- Open the List View you want to visualize.
- Click the Charts icon (bar chart icon near the top right).
- In the Charts panel, click the gear icon and select New Chart.
- Name your chart, then configure: Chart Type (vertical bar, horizontal bar, or donut), Aggregate Type (sum, count, or average), Aggregate Field (the field to calculate), and Grouping Field (how to segment the data).
- Click Save.

Charts are object-level. Once created, they’re available across all List Views for that object (except ‘Recently Viewed’)*. This is great for giving sales teams a quick visual breakdown of pipeline by stage, owner, or account without ever leaving the object tab.
*”Recently Viewed” is excluded because it’s not a true filtered list view; it’s a system-generated view that just tracks whatever records you happened to open lately. It’s essentially a browsing history rather than a defined dataset, so there’s no meaningful or consistent data set to build a chart from. Salesforce restricts charts to list views with actual filter criteria because the chart needs a stable, intentional subset of records to aggregate and visualize.
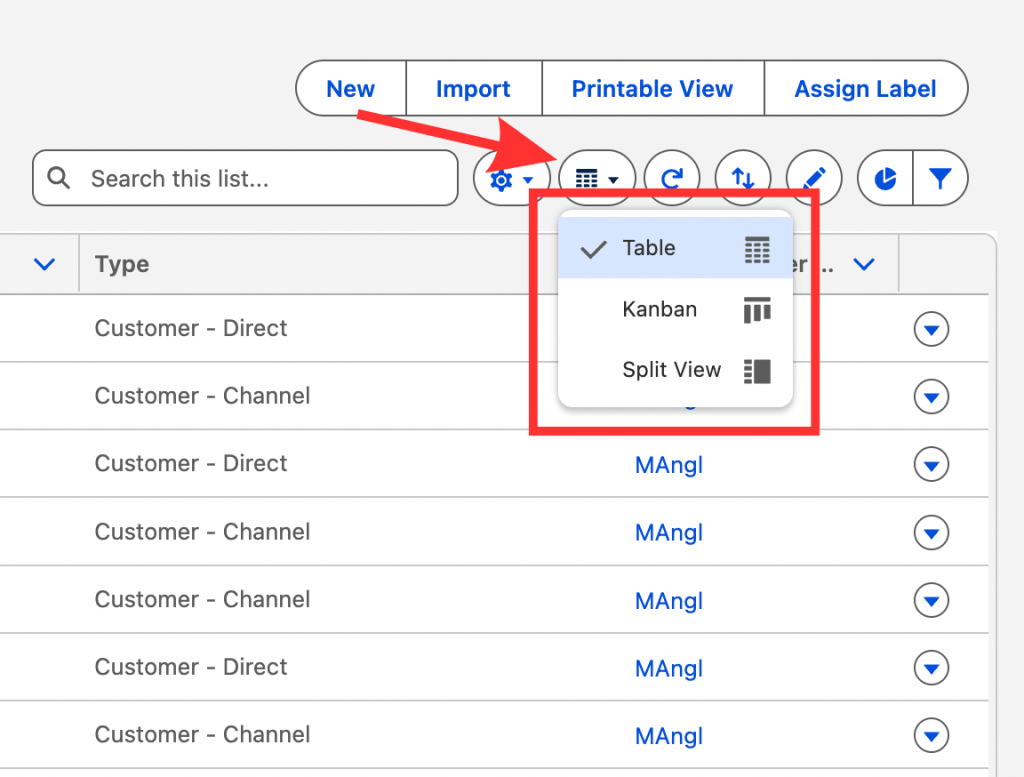
Kanban View and Split View
List Views aren’t just tables. You can switch to Kanban View by clicking the layout toggle icon at the top of the list. Kanban organizes records into columns by a field you choose (like Stage or Status) and lets you drag records between columns; it’s great for pipeline management and case triage.
There’s also Split View, which shows the list on the left and record details on the right side of the screen: ideal for anyone making calls or sending emails from a list of records. No more clicking back and forth.
Practice It on Trailhead
The best way to lock in what you’ve learned is to do it yourself. Salesforce has two resources specifically for List Views:
- Create and Customize List Views
- List View Quick Check: a hands-on challenge where you build and share a List View with specific filters for a sales team scenario
Both are short, hands-on, and free. If you’re newer to Salesforce admin work, completing them will also earn you Trailhead points and badge credit.
Conclusion
With List Views, the depth is there when you need it: filter logic, inline editing, charts, Kanban, sharing with precision. Once you start building them intentionally, you’ll wonder how you ever worked without them.
Go build a few, share the best ones with your team, and let us know in the comments which objects you find List Views most useful for.
Note: List Views aren’t limited to object records. You’ll also find them in Setup: for example, when browsing Flow definitions or other metadata. The same basic interactions apply.
Explore related content:
How To Build Inline Editing for Screen Flow Data Tables in Salesforce
Solve the Flow Picklist Record Type Gap with Vibe Coding
Profiles and Permissions in Salesforce: The Simple Guide for Admins