Integrating the New Flow Action Button From Summer ’24

How to make your screen flows even easier for users
Flow continues to be a point of focus for Salesforce, and the Summer ’24 release is no exception. For me, the new Action button provides a wealth of opportunities to improve user experience and solve those use cases which might have needed multiple screens.

Before this release, the only way I knew how to run a query from within the same flow screen was to use the excellent ‘DataFetcher’ by @joshdayment, usually coupled with a Data Table to show the returned records. This component adds great functionality to your screen flows but does mean that you need to understand some SOQL, which can be rather advanced for some admins.
The new Action button, currently in Beta, allows you to run a subflow with the click of a button and returns the results to be displayed to your user.
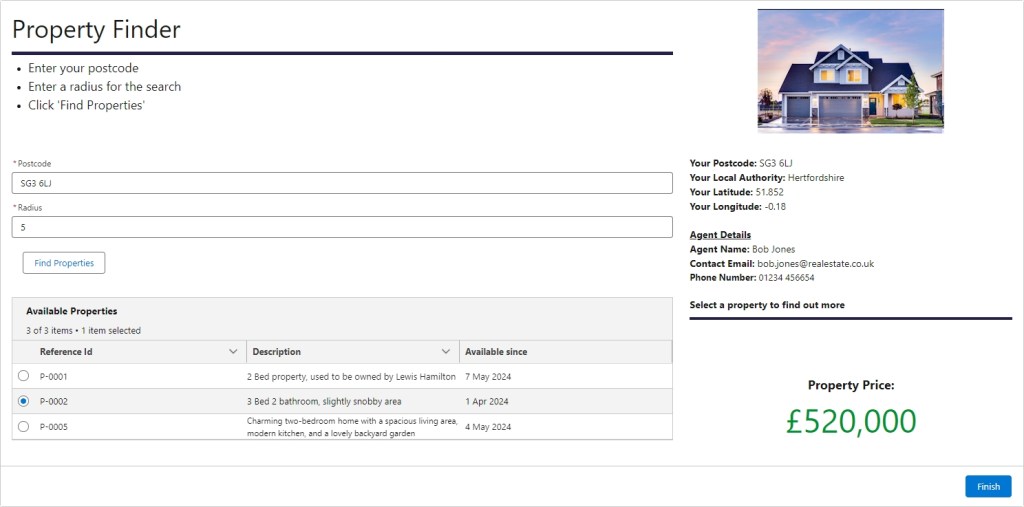
To test the capability of this new feature, I decided to build a property finder flow, as detailed below.
Use Case:
Design a process which enables a user to enter a UK postcode, verify it is genuine and then return details of any available properties within a user-specified radius as well as the contact details of the relevant property agent, based on the local authority.
To achieve this, there will be three main elements:
- An API call to verify a UK postcode and return geographic details such as the local authority.
- An Apex Action to search for records within a user defined radius (geolocation)
- A ‘Get Records’ to find the relevant contact
PreWork
For this example, there is an assumption that you have done some pre-work in your org:

- A Custom ‘Property’ object, which has some relevant fields including a geolocation field for latitude and longitude
- A custom field on the ‘Contact’ object, which identifies the area an agent covers; the values in this field should match what could be returned by the API call (I went with Local Authority)
- A selection of test agent records and property records, which will fall within the geographical area of the postcode/radius you will be testing
Subflow Recipe
The first step is to create the autolaunched subflow, which is going to be called by the action button. We need a postcode variable (text) and a radius variable (number), both ‘available for input’ as well as output variables so we can return the results of the API callout and the apex action.
Once we have our variables, we can move onto the API call (HTTP Callout). The video below guides you through the steps but in this case you can use the postcodes.io API with no authentication.
Our next step is to have a decision element. This checks for the status response of the API call, and allows us to either continue with the flow or return the error to the screen flow and warn the user that there is an issue with the postcode (more on that later). Finally, if the API call was successful, we assign our chosen values (e.g. latitude, longitude and local authority) to the variables.
Using ‘Get Records’ to find the Local Agent

The next stage is to find the local agent. For this, we are going to use the Get Records element and filter it based on the response from the API call matching the value.
Remember to add a fault path in case there is a problem!
Apex Action to get Property records
The Apex Action takes advantage of the Geolocation function to find records within a radius. The query takes the latitude and longitude variables that were assigned from the API call and the radius, which was entered by the user. As a non coder, I admit to using ChatGPT to help me write it but I would obviously have an actual developer do this in real life! Remember to choose which fields you want returned so you can use them later in the screen flow
The query
SELECT Id, Name,Property_Description__c,Price__c,On_Market_Date__c,Address__c
FROM Property__c
WHERE DISTANCE(Lat_and_Long__c, GEOLOCATION(:input.latitude, :input.longitude), ‘mi’) < :input.radius
After the Apex Action has completed, we need to loop through the returned records. We then assign them to a new record collection. This can then be marked as ‘available for output’ and therefore useable in the main screen flow.
Building the Screen Flow
For this demo, I have decided on a simple single screen flow. In reality, you may wish to complete the business process. This could involve creating appointment records between the agent and the user, based on the property they selected. It’s good practice to build out a complete solution, as they can always be used to demonstrate your skills when looking for a new job!
Configuring the Action Button
When adding the component to our screen, we are asked to choose an Action (subflow) that it will trigger. We can change the button label to make it more user friendly and set component visibility if required.
To configure the action, we need to set the input values which will be carried into the subflow. (If you don’t see your variable, check that it is marked ‘available for input’ in your subflow.) In this case, we are taking the postcode and radius components that are inputted by the user.

Displaying the returned records
To show the returned records we are using a standard Data Table. To find the record collection, drill into the results from the screen actions and select the returned record collection
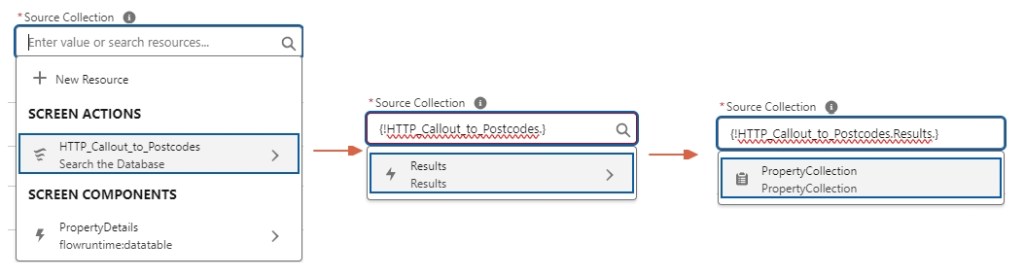
We can then choose the relevant columns to display and configure the rows so that only one row can be selected.
Location data and Agent details
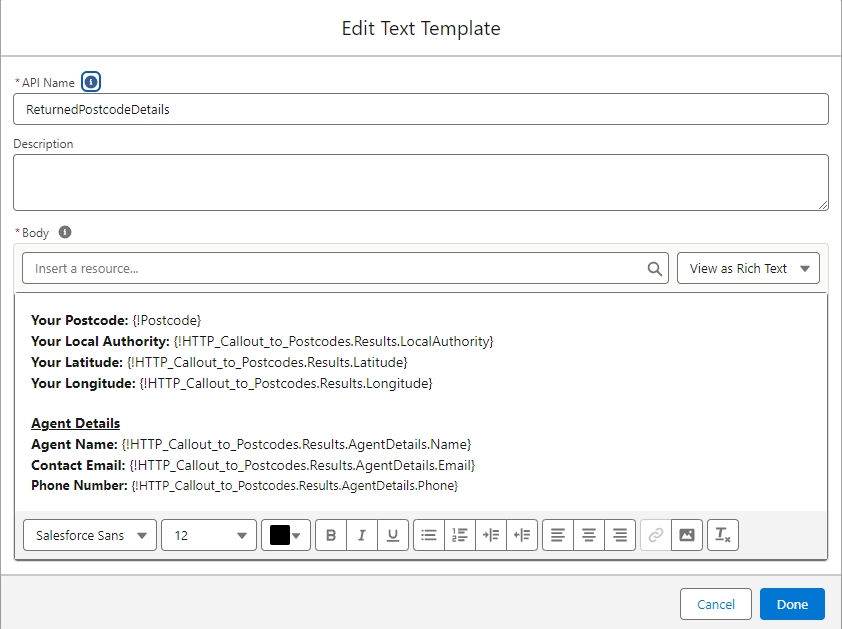
To show the information returned from the API call and the contact details for the agent, we can use a text template with component visibility. We don’t want there to be empty fields before the button is clicked. So, we simply set the visibility to display when the the call success returns a ‘true’ value.
For the text template, use the ‘insert a resource’ to find the relevant values from your results.
A final enhancement we can add is an error text box which indicates that there is a problem with the postcode. As mentioned earlier, we built in a decision in the subflow. This checked the status code which was returned from the API call. If it was anything other than 200 (a success) we assigned a set value to the status variable. This is then passed back into the main flow so we can use it within the visibility criteria. If there was a problem then the error message shows.
Tidying your screen
For a better user experience, I regularly use screen components from unofficialsf with the ‘Draw a Line’ being one of my favourites! I think it’s really important to try and make your screen flows pleasing to the eye and easy to navigate. A simple line can help break up the areas, enhancing the visual organization of your screen flows. Additionally, some community solutions available can improve your screens’ aesthetics while Salesforce focuses on enhancing functionality before formatting.
A Warning
You will know that everything Salesforce is subject to; governor limits and flows are no exception. If your subflow contains DML statements or queries, these will count towards your limit. So, if your screen flow encourages the user to click the button multiple times, you could find your flow hitting these limits. Try to ensure there is a defined journey so users progress from the screen.
Summary
The new Action button is a fantastic addition to flow which allows you to add more reactivity to your screen. It can handle multiple results from a single click and save you from needing numerous screens where your user has to be looped backwards or click to go back. I’m already thinking of potential use cases in my org. Can’t wait for it to be moved out of Beta!
Read related content:
Top 12 Salesforce Summer 24 Flow Features
TrailblazerDX 2024 Unveiled: Salesforce’s AI Evolution and Data Cloud Frontier

Awesome use case!