Start Autolaunched Flow Approvals From A Button

Salesforce Flow Approval Process revamp was a success. When I look at all the interest I see from the ecosystem, there is a significant number of automation experts experimenting with this feature, and building approvals.

The new approval process is built on Orchestration, and it is free. There are two types of approval processes you can create:
- Record-Triggered
- Autolaunched
I covered the record-triggered use case with the recent Supercharge Your Approvals with Salesforce Flow Approval Processes post. Let me give you another use case where the user can start an autolaunched approval process from a button. I have incorporated the answers to a few questions I recently received into this build.
Escalate a case to a queue of level 2 experts when a second opinion is required.
Start Flows and Orchestrations From a Button
- Quick actions can only be used to add an active screen flow to the page layout. Remember that you are not required to add a screen element to your flow, but your flow has to be saved and activated as a screen flow. Orchestrations are not supported.
- The record Id of the current record on the screen will be automatically passed to the
recordIdvariable. The variable name in the screen flow has to follow this exact syntax. - You can not pass additional input parameter values into your automation.
When you build autolaunched approval process, you build autolaunched automation that can be executed on demand. This is very similar to the autolaunched Orchestration or flow. Although this autolaunched automation can and will have UI components like approval evaluation step screen flows, they can not be called from a quick action button.
As a result, we will build an autolaunched Approval Orchestration and assign it to a button using the URL method. I will explain how we will do that after we complete the build.

Build an Approval Screen Flow From The Template
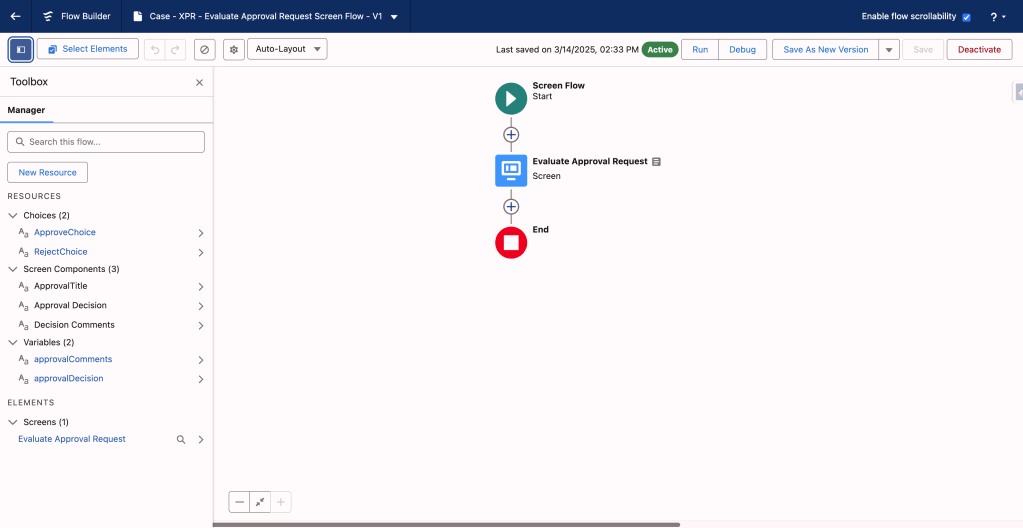
Use the Approvals Workflow: Evaluate Approval Requests template to build your screen flow. When sent to approval, your case will show this screen flow as a work guide item on the lightning page layout.
- Create New Flow.
- Choose Template.
- Pick the
Approvals Workflow: Evaluate Approval Requeststemplate. - Make cosmetic modifications and save your flow and activate it. You can also add additional inputs and screens for your users to submit data, if you need that.

Please note that this template includes all the required variables with the required syntax: approvalDecision and approvalComments. You can build your own screen flow without starting from a template, but then you will have to make sure you complete this required step manually.
Build an Autolaunched Approval Orchestration (No Trigger)
Now that you built the required screen flow, you can build your approval orchestration that will call this screen flow.
For this example, create a queue called Level2 for cases. Add yourself to the queue and assign an email address to the queue that you use for testing purposes.
- Create New Flow.
- Choose From Scratch.
- Choose
Autolaunched Approval Orchestration (No Trigger)from the list of boxes you see on the screen. - Add a stage. You don’t need to configure the start element for this type of Orchestration.
- Add a step. Point it to the screen flow you have saved and activated.
- Scope the approval to the Case recordId. This is where the work guide item will appear for the approvers.
- Assign the approval to the queue you created (Level2). Lock the record for all, do not customize the email.
- Save and activate your approval orchestration.

Configure the URL Custom Button
Go to your all flows list view and choose View Details and Versions under the list view line item chevron menu on the right side. Grab the URL for your Orchestration. It should look like this (depends on your naming): /flow/Case_XPR_Approval_AL_Orchestration
Use the required syntax to add the URL for the approval orchestration to the button. Here is the syntax for my orchestration (view the Salesforce documentation here):
/flow/Case_XPR_Approval_AL_Orchestration?recordId={!Case.Id}&submitter={!$User.Id}&retURL={!Case.Id}
Note that the first part is the URL you just grabbed, and the following parts are the input parameter values for the orchestration. The last parameter directs the screen to the case when the automation is completed.
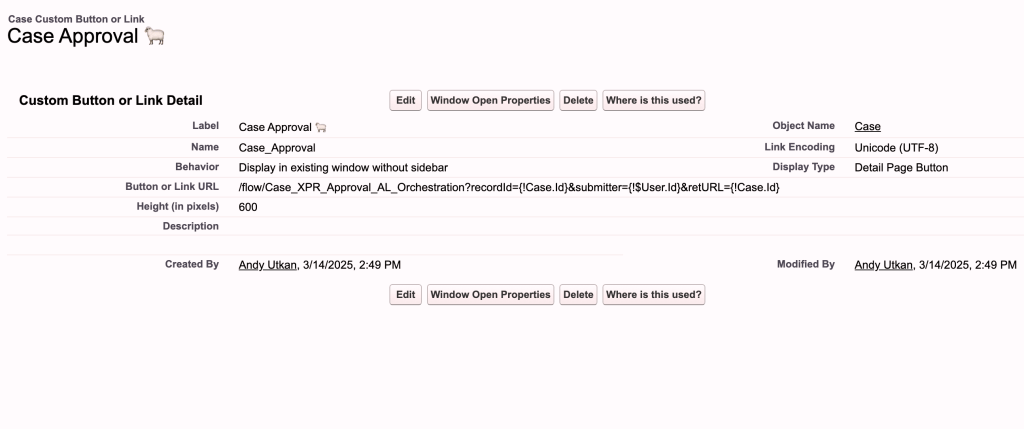
Follow these steps to add this button to the case record page:
- Go to Setup > Object Manager > Case > Buttons, Links, and Actions and add a New Button or Link
- Give your button a label (I will call it Case Approval button here), make it a Detail Page Button, display it in existing window (one of the choices), and choose URL.
- Paste the URL you built for your approval orchestration into the URL window and check the syntax. Save it.
- Go to page layouts under the Object Manager, and add the custom button to the page layout in use.
- Go to the lightning page layout editor for the layout in use and add the Case Approval custom button there. Save and activate (no need if it is active) the page layout.

Add the Flow Orchestration Work Guide Component
While you are on the lightning page layout editor, add the Flow Orchestration Work Guide component to the case lightning page layout. It works well on the top of the right column. Save your page layout. This component will show the work guide item to the users when the approval step is assigned to them. I recommend you choose to hide the component when there is to work guide item assigned to the user.
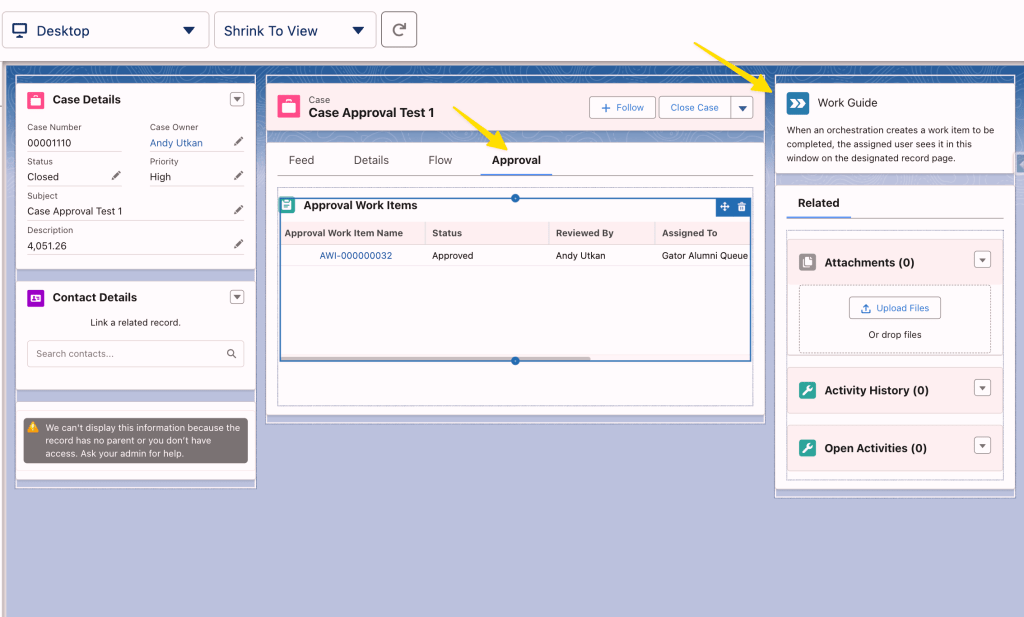
Add the Approval Trace Component
The related lists for legacy approvals won’t show the flow orchestration approval progress for the record. You need to add the Approval Trace component to the page layout for that. Edit the page layout for case, and drag the Approval Trace component to your case lightning page layout. I recommend you create an additional tab for this and add the component there.
Remember that you can see all the approval process information for all your records on the Approvals Lightning App.

Activating Email Response Approvals


Watch the Video for a Full Tutorial
Watch this video to learn how I built an Autolaunched Flow Approval Orchestration and assign it to a button on the Lightning Record Page. This solution shows how you can use queues to assign your approval step. In addition, you can see what email notifications are being sent for approvals, and how approval email responses can be leveraged to complete the approval step.
Explore related content:
Can You Start With a Loop Inside Your Schedule-Triggered Flow?
Keep Salesforce Data Clean With Before Save Flows

Hi Andy,
I’ve been trying to get hands-on experience with the Flow Approval process, but I’m currently facing an issue with the email notifications. I’ve followed all the necessary prerequisites to configure email notifications, but they still aren’t working for me.
I also reviewed your videos on the Flow Approval process for reference.
Here are the steps I’ve completed so far as part of notification configuration:
Created the queue as per the documented steps
Added the queue email address
Despite this, I’m still not receiving the email notifications. Could you please help me troubleshoot this issue?
Looking forward to your support.
Thanks
I believe you asked this question on the Slack community and after guidance discovered that there was an issue related to Gmail.
Hey Andy,
How does the recall path work in the orchestration flow? Do we need to create an autolaunched flow to handle the recall or does the Recall button in the Approval Submission object handle it?
Thanks
There are two ways you can recall: 1) When you view your own approval submissions in the Approvals app in a list view, you can go to the chevron menu on the right side on the row item, and recall there. 2) Recall flow action. You can use the recall flow action to tie this to a button on the record page. When you recall, the recall path elements and actions will be performed.
Hi Andy,
I followed your video and blog and used the same approach to create an approval flow for the Contract record. I created a Screen Flow, an Autolaunched Flow (without trigger) for the approval process and a custom button on the Contract object.
The button URL is:
/flow/Contract_Approval_Flow?recordId={!Contract.Id}&submitter={!$User.Id}&retURL={!Contract.Id}
I added the button to the Contract record page. When I click it, the approval work item is created successfully. However, instead of returning to the Contract record page, it shows a blank page with only “Contract Approval Flow” below the menu.
Could you please advise me what went wrong or what should i do next.
Try this on a fresh record (one that does not have any approvals running): Go to the browser and copy the whole link for the record. Something like https://domain.lightning.force.com/lightning/r/Case/500Ws00000nNNvnIAG/view (in your case it will be for the contract), then append that to your button as follows: retURL=https://domain.lightning.force.com/lightning/r/Case/500Ws00000nNNvnIAG/view , try it. It should work without problems, if it does not work there is an error somewhere, and you should open a ticket.