Mastering Data Rollups in Nonprofit Cloud
A Modern Flow Alternative to Data Processing Engine
Every forward-thinking organization wants to base their business management decisions on intelligence derived from accurate, real-time data. However, as any Salesforce professional knows, “accurate data” is often the result of sophisticated background calculations and complex statistics. Depending on your specific Salesforce environment, the tool you choose for these calculations can vary wildly. In a standard Sales Cloud environment, you might reach for a simple Summary Report or a Roll-up Summary field. But when you move into the world of Salesforce Industries (like the new Nonprofit Cloud – NPC, aka Agentforce Nonprofit), the decision-making process becomes significantly more complex. Suddenly, you have a massive arsenal of tools: the Data Processing Engine (DPE), the Business Rules Engine (BRE), OmniStudio, and of course, Salesforce Flow.

My golden rule is this: Always use the tool you already know if it fits the case at hand. While advanced tools like DPE are powerful, they often come with steep learning curves and license-based limitations. In this tutorial, I’m going to show you how to perform complex donor fulfillment calculations using Flow and the new Transform element, writing that data directly to the Account record in a way that is efficient, scalable, and easy to maintain.
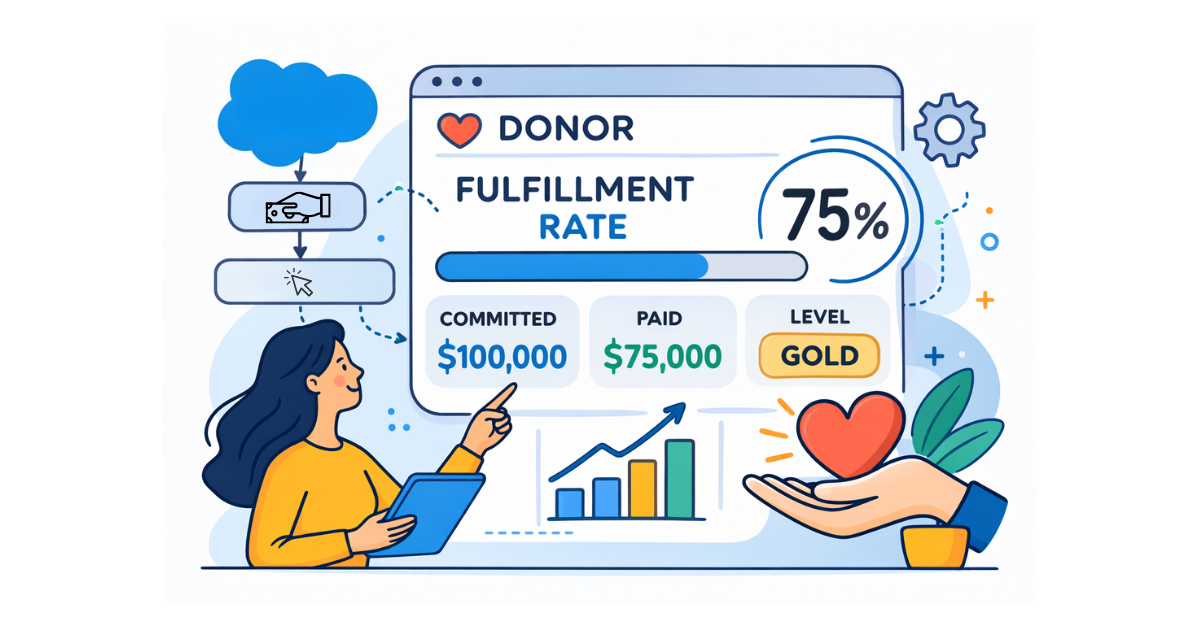
In this scenario, we want to provide our fundraising team with a clear snapshot of a donor’s health directly on their Account page. Specifically, we want to calculate:
Current Year Gift Commitment: In the Nonprofit Cloud data model, this represents a donor’s promise or pledge. For example, if a donor promises to pay $100,000 over the next year, that commitment is tracked here.
Current Year Paid Amount: Total amount actually received via transactions. Transactions represent the actual financial record of money received. A single Gift Commitment can have multiple paid Gift Transactions associated with it as the donor makes payments over time.

Fulfillment Rate: The percentage of the commitment that has been paid.
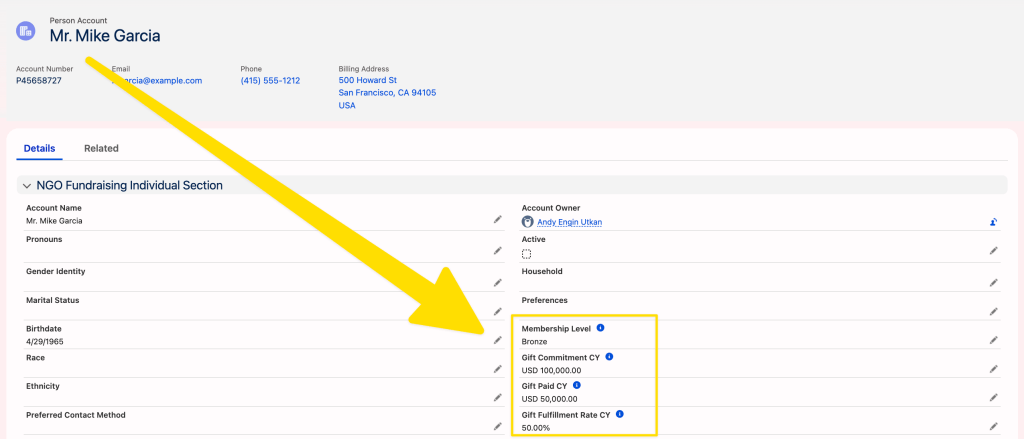
Membership Level: A tiered categorization (Gold, Silver, Bronze) based on their actual payments.
Why Flow Instead of DPE?
Nonprofit Cloud (NPC), built on the Salesforce Industries (formerly Vlocity) architecture, represents Salesforce’s modern reimagining for nonprofits. Unlike the legacy Nonprofit Success Pack (NPSP), NPC runs on the core Salesforce platform, leveraging Person Accounts and purpose-built objects designed to support high-scale fundraising and program management.
NPC includes pre-built Data Processing Engine (DPE) calculations for Donor Gift Summary. Think of DPE as a “mini-ETL” (Extract, Transform, Load) tool built directly into Salesforce. It is designed to handle massive datasets, millions of records, performing joins, filters, and aggregations that would typically cause a standard Flow to hit governor limits. While robust, it presents two significant limitations for many organizations:
-
Complexity: Customizing a DPE requires a deep understanding of data orchestration that many admins haven’t mastered yet.
-
Computational Limits: Your Salesforce license includes a specific number of “DPE Credits” or computational hours. If you run these calculations in real-time or too frequently, you can quickly exhaust your limits.
Flow provides a “Low-Code” alternative that is highly customizable and doesn’t count against your DPE hour limits, making it the perfect choice for on-demand or daily updates for mid-sized datasets.
Step 1: Building the Logic (The Auto-Launched Subflow)
We start by building an Auto-Launched Flow. By keeping the math in a subflow, we ensure that we can trigger the calculation from a button, a schedule, or even an automated trigger without ever having to rebuild the logic.
1. Defining Input Variables
We need three primary inputs to make this flow flexible:
-
recordId: The Account ID we are currently processing. -
StartDate: The beginning of the date range (e.g., the start of the fiscal year). -
EndDate: The end of the date range (e.g., today).
Pro Tip: Use formulas to handle “Null” inputs. If the user doesn’t provide a StartDate, my formula defaults to January 1st of the current year using:
IF(ISBLANK({!StartDateVar}),DATE(YEAR({!$Flow.CurrentDate}),1,1),{!StartDateVar})
IF(ISBLANK({!EndDateVar}),{!$Flow.CurrentDate},{!EndDateVar})
2. Fetching the Data
We use two Get Records elements to gather our collections:
-
Get Gift Commitments: We filter by the
DonorId(matching ourrecordId) and ensure theEffectiveStartDatefalls within our selected range. -
Get Gift Transactions: We filter for records for the same Donor where the
Statusis ‘Paid’ and theTransactionDateis within our range.

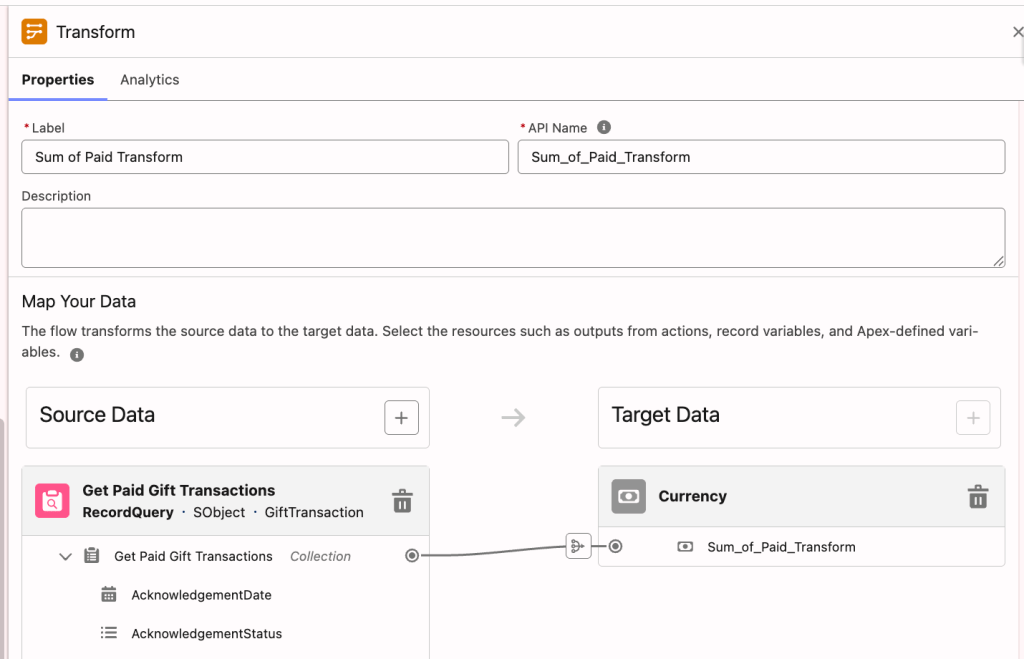
3. Aggregating with the Transform Element
The Transform element is a powerful addition to Flow Builder that allows you to map and aggregate data collections. It eliminates the need for the traditional “Loop + Assignment” pattern when calculating sums or counts, making your flows significantly more readable and efficient. This is where the magic happens. Instead of a loop, we add a Transform element.
-
Source: The collection of Gift Transactions.
-
Target: A currency (single) variable.
-
Mapping: Connect the source collection to the target variable, select Sum, and choose the
Amountfield.
This method is “Bulkified” by nature and much easier to debug than traditional loops. We repeat this process for the Gift Commitments.
4. Categorization via Formulas
To determine the Membership Level, we use a Nested IF formula:
IF(ISNULL({!Sum_of_Paid_Transform}),"",IF({!Sum_of_Paid_Transform}<=50000,"Bronze",IF({!Sum_of_Paid_Transform}<=100000,"Silver","Gold")))
We also calculate the Fulfillment Rate as (number, not percentage):
100*({!Sum_of_Paid_Transform}/{!Sum_of_Commitments_Transform})
Step 2: Creating the User Interface (The Screen Flow)
Now that the logic is built, we need to expose it to the users. We create a simple Screen Flow and place it on the Account record page using a Quick Action.
-
Pass the ID: The Screen Flow automatically grabs the
recordIdfrom the page. -
Call the Subflow: It passes that ID into our “Logic Subflow.”
-
Update the Account: The subflow returns the calculated values (Total Paid, Rate, Level). The Screen Flow then uses an Update Records element to save these values directly onto the custom fields on the Account.
-
The Success Message: We use the new Flow Message component to show a nice, “Toast-like” confirmation to the user that the calculation is complete.
Step 3: Automating with Scheduled Flows
While the “Calculate” button is great for one-off checks, you don’t want your data to go stale. This is the beauty of the subflow architecture.
We created a Schedule-Triggered Flow that runs every night at 8:00 PM.
-
Object: Account
-
Filter: All Active Donors.
-
Action: It simply loops through the accounts and calls the same subflow we used for the button.
This ensures that every morning when the fundraising team logs in, their dashboards and Account views are perfectly up to date without them having to click a single button.

Advanced Considerations: Performance & Scalability
When deciding between real-time (Record-Triggered) and batch (Scheduled) processing, consider your data volume:
-
Real-Time: If you trigger this every time a
GiftTransactionis created, it provides the most “Live” data. However, this could have performance implications. -
Batch: Running this nightly is the safest and most efficient way to handle large volumes of data without impacting the user experience during business hours.
Troubleshooting Common Issues
-
Null Values: If a donor has zero transactions, the Transform element might return a null. Always ensure your formulas handle null values.
-
Currency Conversion: If your org uses Multi-Currency, ensure your Get Records and Transform elements are looking at the “Converted” currency fields to maintain accuracy across different regions.
Conclusion: The Power of Low-Code
The introduction of the Transform element in Flow Builder has significantly narrowed the gap between standard Flows and high-performance tools like the Data Processing Engine. For most Nonprofit Cloud and Industry users, Flow provides the perfect balance of ease of use and computational power.
Explore related content:
The Ultimate Guide to the Salesforce Screen Flow File Preview Component
What Nonprofits Taught Me About Building Salesforce for Humans, Not Just Systems

honestly the transform element is a game-changer for admins who've been stuck in loop hell. bulk calculations without the headache. nice breakdown on when to use flow vs dpe—most orgs are way overthinking it.
Remote Reply
Original Comment URL
Your Profile
Why do I need to enter my profile?
This site is part of the ⁂ open social web, a network of interconnected social platforms (like Mastodon, Pixelfed, Friendica, and others). Unlike centralized social media, your account lives on a platform of your choice, and you can interact with people across different platforms.
By entering your profile, we can send you to your account where you can complete this action.