How to Use a Salesforce Action Button to Validate Lookup Fields in Screen Flows

If you’ve built a Screen Flow before, you know how dynamic and powerful they can be. They let you design user-friendly interfaces that provide real-time feedback and access to almost any piece of data in Salesforce.

But as every Flow builder eventually learns, there’s always a gotcha, that one limitation you don’t discover until your end users start working with what you built. They don’t see it as a technical gap; they see it as a break in the business process.
One of the most common examples of this is validating Lookup fields in a Screen Flow. Sure, you could write a validation rule. However, inside the Flow you can only access the Name and Record ID from that lookup, not any of the related fields you actually need.
That’s not very helpful when you’re trying to make sure a user selects the right type of Account before continuing through several questions or dependent screens.
The Hidden Challenge Behind Lookup Validation in Flow
With the release of Reactive Screen Components, users have come to expect immediate feedback when something they select doesn’t meet business standards. They want to know right away if their choice is valid.
While Data Fetcher works great for displaying data in tables or lists, it isn’t the right fit when the user already knows the single record they want. (Seriously, one of my favorite Apps on the Exchange. Shoutout to Josh Dayment! Get more information about the app here.) It’s also not scalable when all you really need is a simple, picklist-style selection and you have more than just a few records to choose from at the point of the lookup.

Sure, you could add a Decision element after the screen to validate the selection, but that means users don’t find out there’s an issue until after they’ve clicked “Next.” And if every question or screen depends on that initial selection, you’ve just built a frustrating loop that sends them backward, or a string of extra screens to validate user choices along the way. That kills the entire purpose of reactive screens.
Data validation might seem like a small detail, but in reality, it can make or break your user experience, and ultimately affect user adoption.
That’s where Action Buttons come in. Action Buttons provide a simple, real-time way to trigger automation. You can use them to run Apex, call external systems, or launch autolaunched flows.
Let’s get into how I did it!
Building Lookup Validation the Right Way
For this example, I am going to use the Case object with an Account lookup and use the “Ownership” field on the Account in my Trailhead Playground to validate against.
Step 1: Configure Your Screen Flow
Start a new Screen flow if you do not already have one.

Add a Screen to the builder by clicking the + button

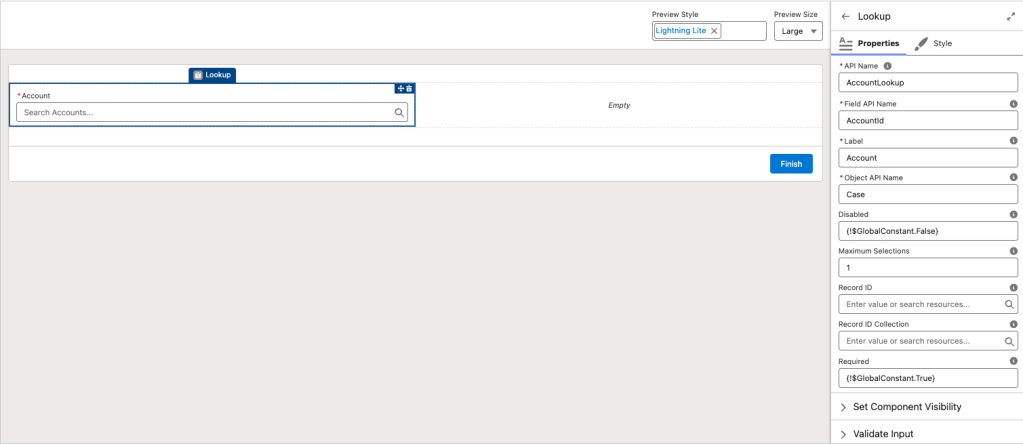
Add a standard Lookup field to your Screen, and set up an Account Lookup field in your screen flow to use the Account field on a Case.
Save your Flow, but leave it inactive for now.
Step 2: Create an Autolaunched Flow
Start by creating a new flow using the Autolaunched Flow (No Trigger) type. This flow will handle all of your validation logic.

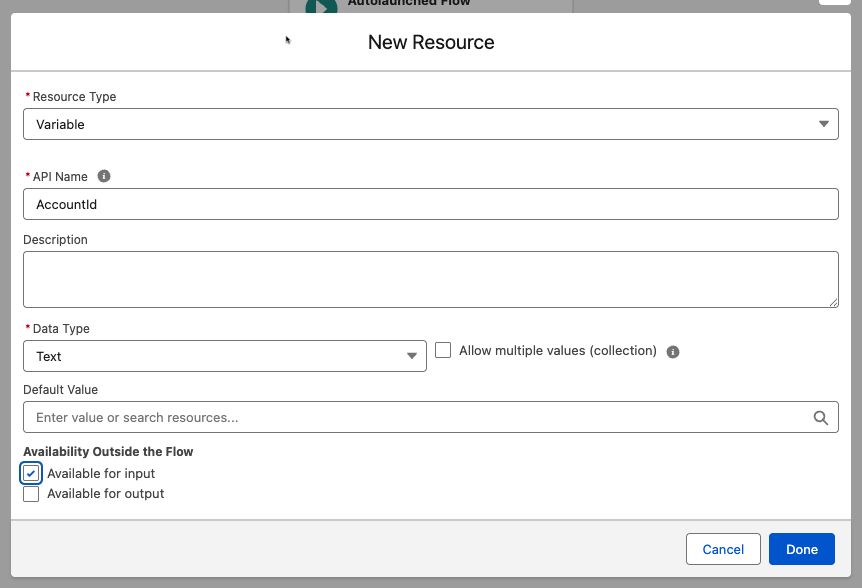
Add an Input Variable for the recordId. Mark it as Available for Input so you can pass in the recordId from the Lookup field in your screen flow.
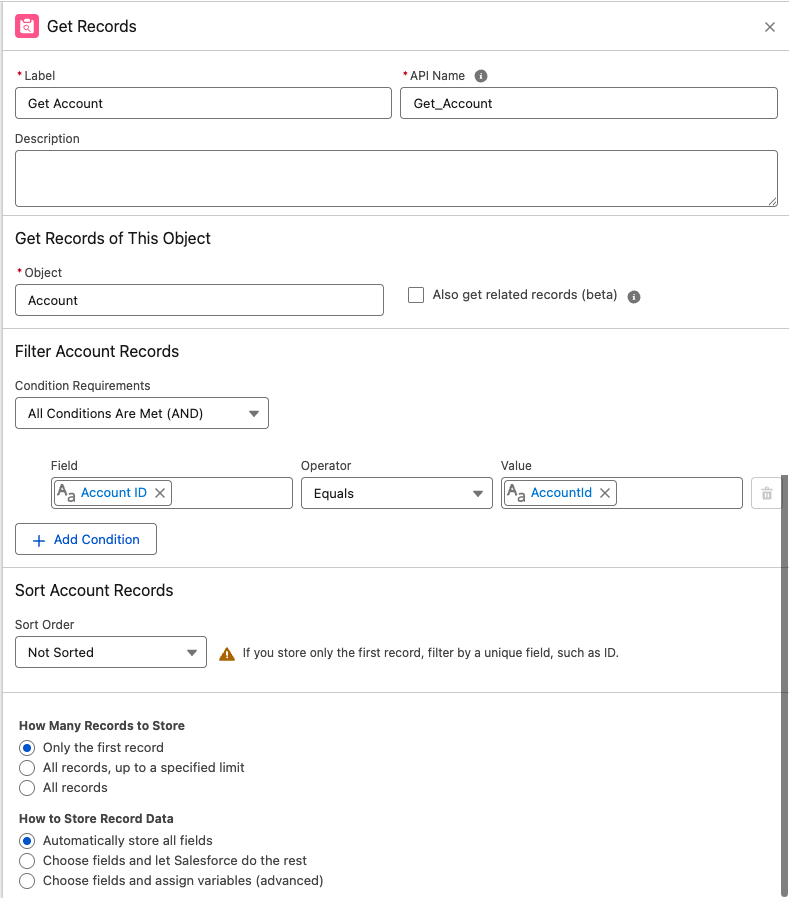
Use a Get Records element to find the matching Account. Set your criteria to Id = recordId and limit to the first record (you can only validate one record at a time).
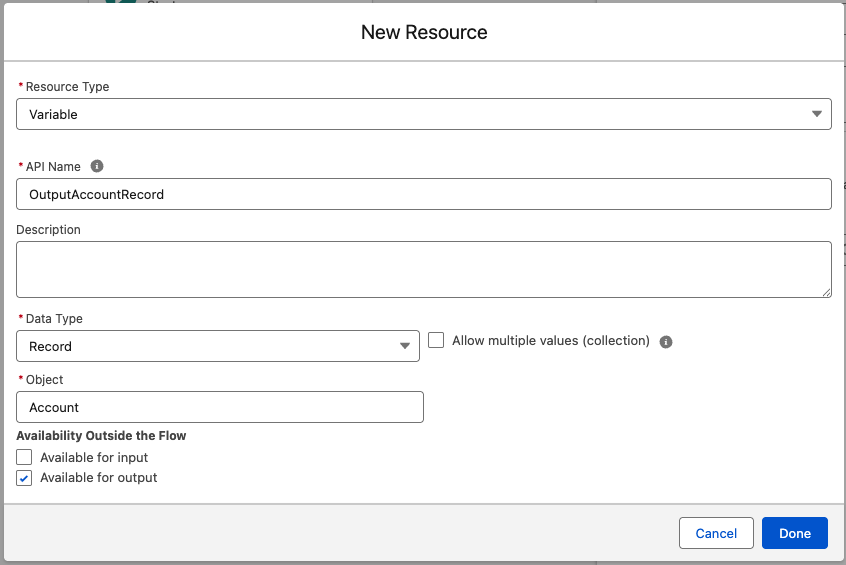
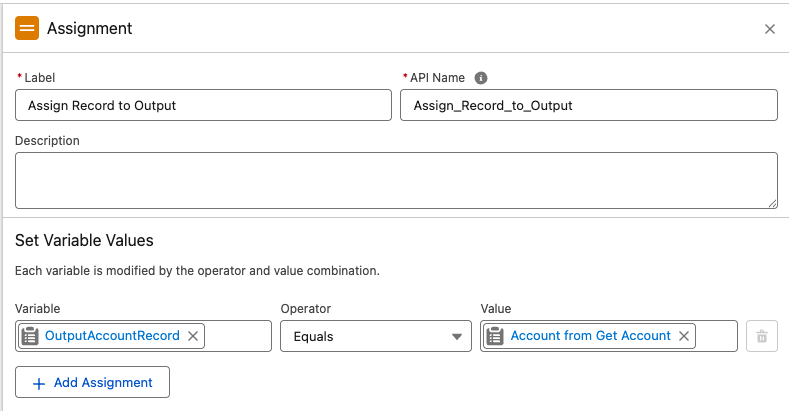
Create a Record Variable to store the record from the Get Record. Mark it as Available for Output so you can pass the found record back to your screen flow and use its fields for your validation rules.
Add an Assignment element to store the result in a Record Variable for the Account object. Here I am storing the entire record so that we can use all fields in my business logic. This design ensures that regardless of how the business changes, I can reuse the flow as is. If a business leader wants to change the rule in a few weeks, you will only need to adjust the Screen flow.
Save and activate your Autolaunched Flow.
Now it’s time to connect it to your screen flow.
Next, add an “Account Validation” Action Button to your screen. This button will trigger the record validation logic you just built in the Autolaunched Flow.
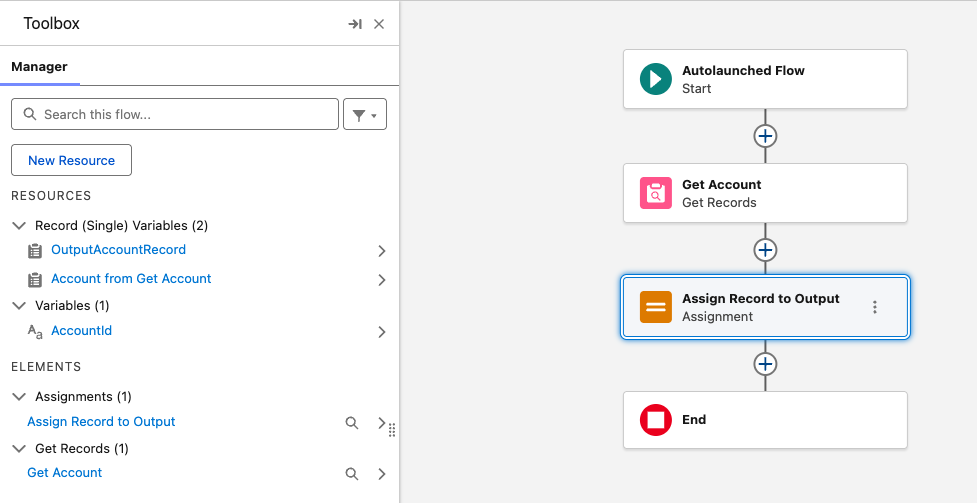
Your flow should now look like this:
Step 3: Add and Configure Your Action Button
Return to your original Screen Flow, then refresh the browser. Ensure your newly activated Autolaunched Flow appears in the list of available actions.
On your screen, add an Action Button and label it something like “Account Validation.”
In the button’s configuration, reference your Autolaunched Flow and set the input variable to the record selected in the Lookup component.
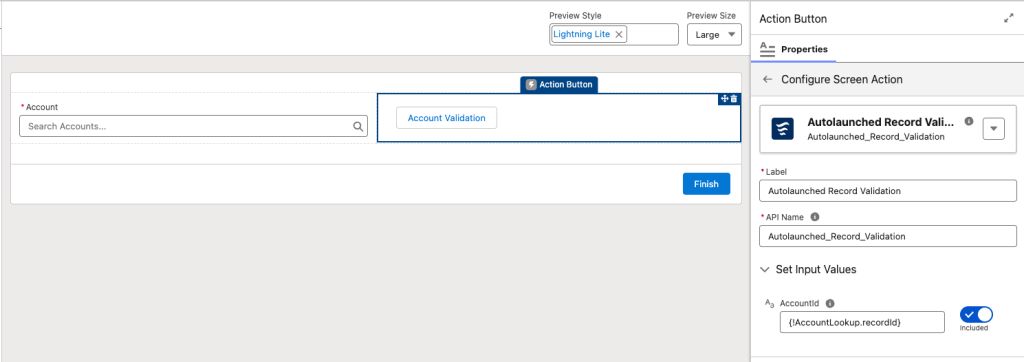
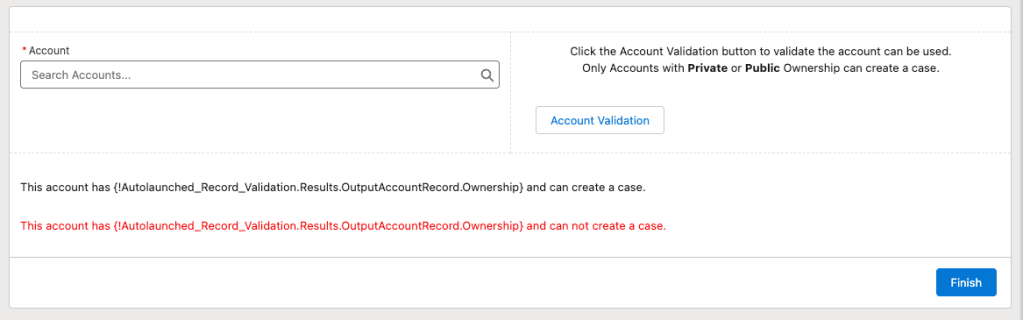
Add Help Text explaining what your button does and the business rule you are checking for. (For example, “Click the Account Validation button to validate the account can be used. Only Account with Private or Public Ownership can create a Case.”).
Step 4: Provide Your Users with Instant Feedback
Add two Display Text components:
One for your “Valid” message (for example: “This account has {!Autolaunched_Record_Validation.Results.OutputAccountRecord.Ownership} and can create a case.”)
One for your “Error” message (for example: “This account has {!Autolaunched_Record_Validation.Results.OutputAccountRecord.Ownership} and can not create a case.”)
💡 Tip: Use merge fields to help why something is or is not valid by mapping through the flow button. Also, I normally close out my screen here and save here before I start working on the viability rules.
Step 5: Add Your Validation Rules
Use Conditional Visibility to control which messages appear on your screen. For example, you can display different text based on the Ownership field value returned from your Output Variable.
Leverage the isSuccess variable from the Action Button to hide or show messages that should only appear after the button is clicked.
💡 Tip:
If you’re not sure what values are being returned, add a temporary Display Text component and map it to those variables. This lets you see what’s being passed back when the button is clicked, or if the Autolaunched Flow fails. You can also use Debug mode to test different scenarios.
Put It All Together and Test It Out
Now that you have put all the pieces together, you are ready to test it out!
Select debug, and try selecting a valid and invalid record by populating the lookup field and click the action button.

With the use of an action button you can give your users real time feedback. This ensures they are following your company’s policies and procedures with the click of a button.
Final Thoughts
In many orgs, a simple message is enough to guide users, especially when object-level validation rules are already in place to catch incorrect or missing inputs. These rules help steer users toward the right selections and automatically fire if anything critical is skipped.
In my case, that’s usually sufficient. For Screen Flows, I display fault messages at the top of each screen. I use the fault path on Create elements to send users back to the relevant screen when something’s missing. This only appears when the flow encounters an error. You can also achieve similar behavior with a combination of Decision and Assignment elements, depending on your use case.
However, if your users need a more definitive stop, for example, requiring them to validate an Account before continuing, there are a few extra techniques you can apply:
-
Group dependent fields in a section with visibility rules tied to a “valid” condition. This keeps the screen mostly blank until the user clicks the button and a valid record is returned. Then, add a Decision element to confirm that the button was clicked and a valid record was retrieved before allowing the flow to continue.
-
If validation wasn’t completed, use an Assignment element to set a text variable (such as an error message) and loop the user back to the same screen to try again.
- To make your Autolaunched flow more reusable across multiple object types and action buttons, you can use a Decision element to branch logic based on the first three characters of the recordId (e.g. “001” for Account, “003” for Contact).
- By using a generic input variable named recordId, you make the flow easier to understand and reuse. From there, route the logic to different branches depending on the object type. Then, perform a Get Records to retrieve the full record, and then assign it to an output variable for use in the calling flow.
Lookup validation doesn’t have to slow down your Screen Flows. You CAN deliver real-time validation that feels native and scalable across objects. This approach keeps users informed, reduces friction, and reinforces the trust your org has in Flow-built automation.
Explore related content:
How To Build Inline Editing for Screen Flow Data Tables in Salesforce
One Simple Salesforce Flow Hack That Will Change Your Workflow Forever!
Automate Permissions in Salesforce with User Access Policies

I was having an impossible time validating a lookup field, and this did the trick. Thank you.
A couple of refinements I made:
-In the subflow Get Records element, I saved the record directly to my output variable, saving me an Assignment element
-I added the screen action to the screen itself in my main flow, saving the user from having to click a button to validate the lookup input. It’s validated immediately after they select!