Salesforce Spring ’26 Is Dropping Unverified Emails
Here's What You Need to Do Before the Deadline

If your org sends email from Salesforce, a critical change is coming that could silently block messages from reaching your customers. Starting with Spring ’26, Salesforce requires all outbound email-sending domains to be verified before messages can leave your org. Unverified domains will be dropped. No bounce, no error for most automations, just silence.

This change is also worth understanding in a broader context. Email platforms are tightening security and spam filters across the board because AI has made phishing and scam attempts significantly cheaper and more scalable, and the risk is increasing rapidly. Salesforce is responding to that. Notably, this is the first time Salesforce has enforced a change outside of its regular release schedule, which signals how seriously they’re treating it. The urgency is real: without domain verification and proof of domain ownership, bad actors could send emails that appear to come from your org’s domain, exposing your customers to phishing attempts.
Here is everything you need to know: what is changing, who it affects, and exactly how to get compliant before the deadlines.
What Is Actually Changing
Salesforce is tightening how it handles outbound email from Core orgs. Going forward, any email sent from a domain you own must be verified in Salesforce before the mail transfer agent (MTA) will allow it to go out. If the domain is not verified, the email gets dropped.
This applies to all Core org email sending methods:
- Email Composer (the manual send)
- Apex email
- Flow-triggered emails
- Workflow alerts
- Process automations
The change does not affect Marketing Cloud or Marketing Cloud Advanced (on Core) emails. It also does not apply to Einstein Activity Capture or Inbox. Emails sent from free consumer domains like gmail.com or outlook.com are also exempt.

The tricky part with non-composer sending methods is that there is no visible error for end users when a message gets blocked. The email simply does not send. Admins can catch these failures by checking email logs in Setup and looking for the error string: 550 5.7.1 Delivery not authorized, message discarded.
The Rollout Timeline and Deadlines
Salesforce is phasing this change in across Spring ’26, beginning with patch 10 on March 9, 2026.
Phase 1: March 9, 2026: Domain verification becomes required immediately for all new orgs (including sandboxes and scratch orgs) and for any new email-sending domains added to existing orgs.
Phase 2: Grace Period for Existing Domains: Domains that have actively sent mail within the last 30 days receive a temporary exemption, but that window closes fast:
- Sandboxes: March 30, 2026
- Production orgs: April 27, 2026
One important nuance: the grace period only protects domains with recent sending history. If you try to send from a domain that has not been used in your org in the past 30 days, it fails immediately even before those deadlines. To unlock those domains, you must set up verification now.
How to Verify Your Domains
Salesforce gives you two paths to domain verification. DKIM is the recommended approach because it improves deliverability on top of satisfying the requirement. Authorized Email Domains is the simpler fallback if DKIM is not an option.
Option 1: Set Up DKIM Keys (Recommended)
DomainKeys Identified Mail (DKIM) attaches a cryptographic digital signature to outbound emails that proves the message came from your domain and was not altered in transit. Email providers use this signal to route messages to the inbox rather than spam. Setting up DKIM satisfies the domain verification requirement and actively improves your deliverability.
Here is how to create a DKIM key in Salesforce:
- In Setup, search for DKIM Keys and open it.
- Click Create New Key.
- Select 2048-bit for the RSA key size (recommended unless your setup requires smaller keys).
- Enter a Selector — a unique string of letters, digits, and hyphens, starting with a letter or number. For example:
example-sf-a. - Enter an Alternate Selector for key rotation. For example:
example-sf-b. - Enter the domain name you send email from. Note that once you save the key, you cannot edit this field.
- Set the domain match pattern to match your domain exactly. For example, if the domain is
example.com, set the match pattern toexample.com. Do not use wildcards for domains you own. - Save the key. Salesforce generates CNAME records for your domain within about 15 minutes.
Once Salesforce publishes those records, you need to add two CNAME entries to your domain’s DNS. Here is an example of what those records look like:
example-sf-a._domainkey.example.com.  3600  IN  CNAME  example-sf-a.k4tyd2.custdkim.salesforce.com.
example-sf-b._domainkey.example.com.  3600  IN  CNAME  example-sf-b.e6mxu6.custdkim.salesforce.com.
DNS propagation can take up to 72 hours. Once the CNAME records appear on the DKIM Key Details page in Setup, click Activate on the key. Your domain is now verified.
Salesforce automatically rotates DKIM keys every 30 days using the primary/alternate key pair structure, so there is no ongoing maintenance required after initial setup.
Important subdomain note: A DKIM key for example.com does not cover mail.example.com. Each domain and subdomain requires its own separate DKIM key.

Option 2: Authorized Email Domains
If setting up DKIM is not feasible right now, you can verify your domain using the Authorized Email Domains feature:
- In Setup, search for Authorized Email Domains and open it.
- Click Add and enter your domain name (for example,
example.com). - Save the record. Salesforce generates a verification key for the domain.
- In your DNS, add a TXT record containing the verification code. The record can use the domain name directly or the
_sfdv.prefix. Example:
example.com. 600 IN TXT "00D000000000P08=1TB00000000000B"- After DNS propagation (24 to 48 hours), return to Setup, edit the domain record, and enable Verify domain ownership. If verification succeeds, the setting stays enabled.
This method works, but it does not provide the deliverability benefits that DKIM does.
Checking Your Current Status
Before the deadlines arrive, take five minutes to confirm where your org stands:
- In Setup, search Authorized Email Domains and look for any verified domain records.
- In Setup, search DKIM and look for active keys.
If a domain appears in either list with verified or active status, email sent from that domain is covered. If you send from multiple domains or subdomains, confirm each one is represented separately.
For users who try to send from unverified domains through Email Composer, Salesforce displays a blocking error: “Not allowed to send from an unauthorized domain.” Automations fail silently, which is why the proactive log check is so important.
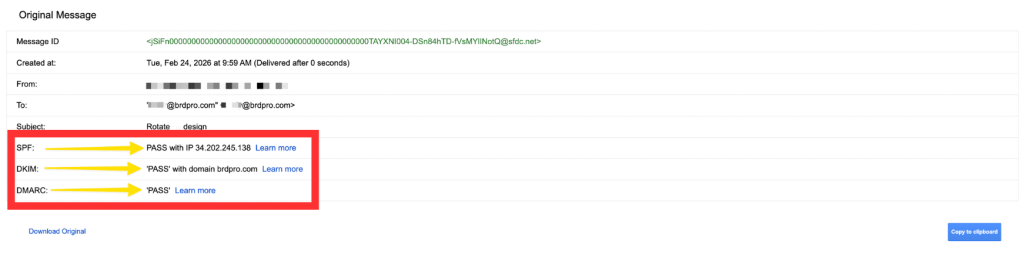
If DKIM passes, you’re in good shape, but ideally all three should pass: SPF, DKIM, and DMARC. That’s how you verify, from the receiving end, that your setup is working correctly.
What About Sandboxes?
Sandboxes are subject to the same requirements and have an earlier deadline of March 30, 2026. DKIM keys and Authorized Email Domains are not automatically copied when you create a new sandbox, so you need to set up fresh verification records for each sandbox environment separately.
A Note on Community and Experience Site Users
If a community or Experience site guest user has an email address on an unverified domain, Salesforce falls back to the org’s Default No-Reply Address for that send, provided the No-Reply address and its sending domain are both verified.
Conclusion
This change protects email deliverability and tightens security across the Salesforce platform. The deadlines are close, and the consequences of missing them (silently dropped emails from automations, failed customer communications, broken workflows) are significant enough to treat this as urgent.
The action path is straightforward: audit your sending domains now, set up DKIM keys for each one (or configure Authorized Email Domains as a fallback), coordinate with your DNS admin to publish the required records, and confirm verification before March 30 for sandboxes and April 27 for production. Do not wait on the grace period! It only covers domains with recent sending history, and any gaps in that history mean emails are already failing today. For the full documentation on this change, click here.
Explore related content:
Einstein Activity Capture: The Guide to Salesforce Email and Calendar Sync
New Trailhead Badge: Accessible Salesforce Customizations
Identify and Manage Page Errors with the New Error Console in Spring ’26

hi Meredith,
thx for this heads up!
You stated above “It also does not apply to ….external email relay services where email routes through your own mail servers rather than Salesforce’s.”
From Salesforce Support i got the following:
“While an Email Relay allows you to route emails through your own servers, Salesforce still requires
the **sending domains** to be verified.
The relay does not exempt you from verifying domain ownership via **DKIM** or **Authorized Email Domains**”
So in ALL cases you have to authorize the sending Domains.
Peter, thank you for catching that! I fixed it.