n8n and Salesforce: Simplifying Complex Automation
A Step-by-Step Guide to Integrating Gmail, AI, and Salesforce with n8n

Let’s face it; integration in Salesforce is not as easy as it is supposed to be. It requires coding in Apex in most cases, so non-developers are already out of the game. There is no native logging solution and a developer has to build one from the ground up (or use Nebula Logger). It is difficult to call AI interfaces such as Claude API and OpenAI Responses API, and even more so to put Salesforce on the recipient side and another widely known service, such as Gmail or WhatsApp, on the triggering side.
Luckily for us, Salesforce is trying to remedy this and break Agentforce out of self-containment by releasing Headless 360 and letting external channels (apps, agents, bots) interact with Salesforce without relying on standard UI flows. However, this doesn’t solve all of our problems regarding integrations and automations: we still need an integration layer for event ingestion on Salesforce’s side. We may want to trigger Salesforce from our business email inbox. Additionally, we may want to create a Lead using WhatsApp or Telegram, send a message on those platforms without relying on Apex, or simply use basic triggers and webhooks instead of agentic workflows.
What is n8n and Why Use It?
Here’s where n8n (pronounced “n-eight-n” or sometimes “nathan”) comes in. With its name standing for “nodemation”, n8n provides a visual interface similar to Flows for extensive business process automation including AI capabilities, fully deserving its nickname of “the Swiss army knife of workflow automation.” It enables businesses to build powerful automations and AI-driven workflows, such as integrating large language models, handling data pipelines, and orchestrating cross-system processes while retaining full control through self-hosting or cloud deployment. Any service you may need for your personal or commercial uses, including Salesforce, Gmail, WhatsApp, Instagram and Claude API, is available in n8n. It also allows you to natively write code in Python or JavaScript when you need it, showcasing this capability as, “Code when you need it, UI when you don’t.”
n8n offers a free trial for 14 days, with a fair pricing plan depending on your needs. You can also choose to self-host n8n to overcome its governor limits including the number of workflows and monthly workflow executions if your automation needs are high.
Automating Salesforce Lead Creation from Gmail
For the purposes of this article, we assume that we are running a travel agency. Leads are coming to us through emails, and our requirement is to automate the process of Lead creation instead of manually entering the Lead values every time. An email that necessitates a Lead creation will have content that expresses interest in a tour package: “I would like to inquire about your Grand Canyon tour package” or “I would like to book your Japan tour.”
On the other hand, we may also receive emails that don’t fall into this category; they may contain complaints, reviews or they may simply be promotional emails. Therefore, we have to introduce a layer of sentiment analysis, which will be achieved through AI, to our workflow. When the sentiment is positive (i.e. the email came from a prospective client), our workflow should create a Lead. When it is negative, it should do nothing.
Creating the Workflow
Click the “Create workflow” button at the upper right corner.

We are met with two options: building our workflow manually or with AI. You can try out the AI creation tool, but for this tutorial we will be adding our workflow trigger manually. Click “Add first step,” then search for Gmail on the toolbar that appears on the right. It should be under the “On app event” section. There is only one trigger: On message received. Click it and log into your Gmail account under the Credential field. These credentials will be saved into your personal credential archive which can be found under the “Credentials” menu in the page shown above. Leave everything as is and go back to your workflow. It should look like this:

Analyze Email Content with AI
The content of the email should then be analyzed by an LLM to check whether it belongs to a prospective customer or not. Click the small plus sign and add the LLM of your choice (OpenAI, Anthropic, Google Gemini etc.) Log in to the API that you chose when you are prompted by n8n, make sure that the Resource value is selected as “Text” and the Operation is “Message a model”. Choose a model and enter a prompt that will not only do sentiment analysis for you, but also summarize the email content and extract the first and last name of the email sender from the content. Below is a sample prompt that I am running on Claude Haiku 4.5 with the Anthropic Message a model node:
You are a travel agent who will receive booking requests and inquiries about tour packages through email. Below is the content of the most recent email received by a prospective customer (below the separator given as '-----'). Analyze the content and return a JSON containing four variables:
- isProspect: A Boolean value that contains whether the email sender is looking to book a tour package (e.g. "I want to book..." or "I would like to buy..."), or is asking questions about a tour package (e.g. "I would like to inquire...", "I want to ask about this package..."). If the sender is doing so, the value should be true. If the sender is not doing so (they may be issuing a complaint, it could be a promotion mail etc.), the value should be false.
- emailSummary: A String value that contains the summary of the email in one or two sentences.
Output only the JSON value and nothing else.
- firstName: A String value that contains the first name of the email sender if it can be found in the email.
- lastName: A String value that contains the last name of the email sender if it can be found in the email.
{{ $json.snippet }}
Breaking Down the Prompt
Let us pause here for a while and examine our prompt. Essentially, we are configuring our AI so that it:
- assumes its role as a travel agent/assistant
- knows where the prompt ends and the email content begins
- analyzes the sentiment given in the email, in the sense that an email such as “I would like to book your Japan tour” would belong to a prospective client, while “Congratulations! You have earned a coupon” would not
- summarizes the email content and extracts the first and last name of the email sender
- returns the output as a JSON which makes it easier for us to parse
The {{ $json.snippet }} at the bottom of the prompt refers to the body of the email, which can be put into the free text area by simply dragging and dropping from the left hand side of the screen. The reference will be resolved when the workflow runs, wrapping up the email content inside the prompt and handing it over to the LLM.
The output of the LLM will be a String that looks like:
{
  "isProspect": true,
  "emailSummary": "The sender wants to book the Grand Canyon tour package.",
  "firstName": "John",
  "lastName": "Appleseed"
}
Parse the AI Response with a Code Node
This is obviously not a JSON, but a format that allows the AI to return a JSON value in code view. To be able to parse this, we need to get rid of the artifacts that we don’t want (such as “`).
Add a Code node (found under the “Core” section) and choose Code in JavaScript. There is also an option to code in Python but vanilla Python does not have the capability to parse JSON and importing libraries is forbidden for security reasons (unless you self-host n8n—an additional advantage of self-hosting). Therefore, we will be going with JavaScript.
Select “Run Once for All Items” as its mode and enter the code below:
const response =  $input.first().json.content[0].text // adjust to your actual field name
const jsonStr = response.replace(/^```json\s*|\s*```$/g, '').trim();
const data = JSON.parse(jsonStr);

return [{
  json: {
    isProspect: Boolean(data.isProspect),
    emailSummary: String(data.emailSummary),
    firstName: String(data.firstName),
    lastName: String(data.lastName)
  }
}];

With this code block, we have:
- formatted the text that was returned by the AI into an actual JSON
- parsed it into 4 different variables (isProspect, emailSummary, firstName, lastName)
Now it’s time to use these variables. Add a new “If” node (found under the Flow section) and add only one condition: {{ $(‘Code in JavaScript’).item.json.isProspect }} is true.

Connection with Salesforce
Here’s where we finally use Salesforce. Before we add the Salesforce node to the end of the true segment of the If node, we need a client ID and secret from Salesforce. To obtain those, we need to create an External Client App (Connected Apps are deprecated with the Spring ’26 release). Go to your org, then go to Setup → App Manager. Click New External Client App.
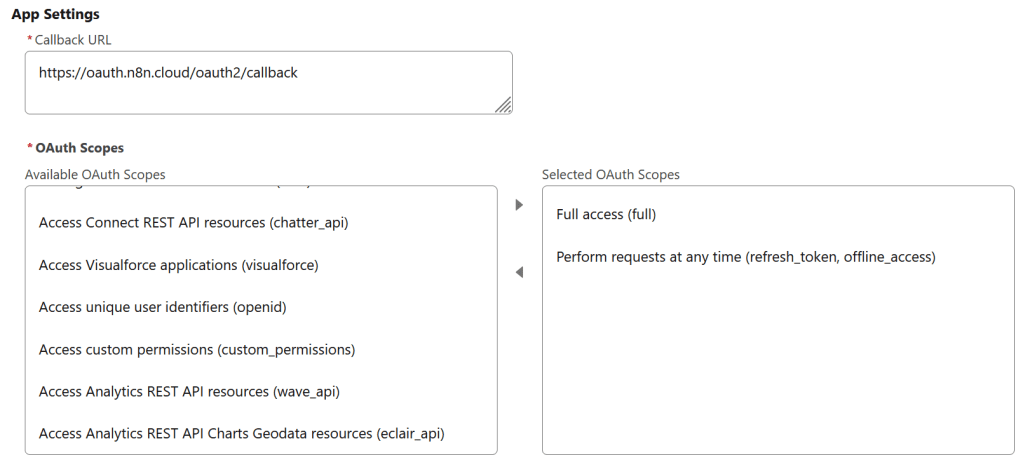
Enter the app name and contact email (this can be your email). Under the API (Enable OAuth Settings) section, tick the Enable OAuth checkbox. Once the other fields pop up, enter https://oauth.n8n.cloud/oauth2/callback as the callback URL (if you are self-hosting, it will depend on your domain). In the OAuth Scopes section, select these scopes:
- Full access (full)
- Perform requests at any time (refresh_token, offline_access)
Configuring Your Salesforce Connected App
In the Flow Enablement section, select Enable Authorization Code and Credentials Flow. Under OAuth Policies, make sure the following settings are checked:
- Require Secret for Web Server Flow
- Require Secret for Refresh Token Flow
- Require Proof Key for Code Exchange (PKCE) Extension for Supported Authorization Flows
Save and enable your External Client App. Once you’re in the app page, go to Settings and find the Consumer Key and Secret button under App Settings. You will be asked to verify your identity by a verification code sent to your email. The Client ID and secret will then be revealed. More info about how to achieve an n8n-Salesforce connection can be found here.

Now add the Salesforce node (found under the “Action in an app” section) at the tail end of the True arm of the If node and choose Create a Lead as your action. n8n will ask for your credentials at the top of the screen. Click it and paste the Client ID and secret values to their appropriate fields.
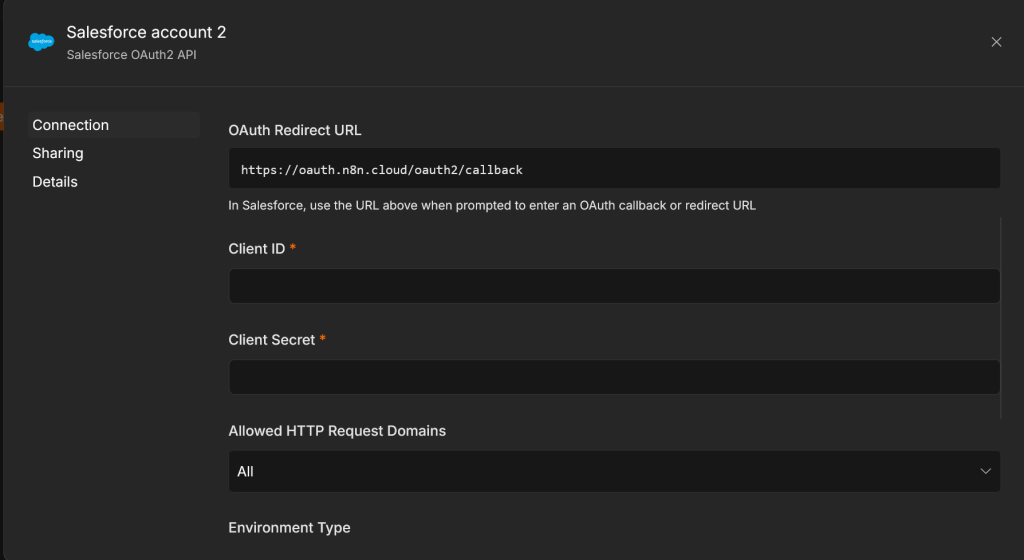
Connecting n8n to Salesforce and Mapping Your Fields
You will then be prompted to self-authenticate with your username and password. If everything goes right, the integration will be complete. If you are met with a generic error, wait for 10-15 minutes before trying again or create a new External Client App from scratch and try to connect with that one.
Once the connection is done, you are now ready to trigger Salesforce through your workflow. Drag and drop the values returned from your Code node to their appropriate fields; that is, lastName in the Last Name field, firstName in the First Name field and emailSummary in the Description field. Since these are personal Leads, I chose to leave the Company field as “None”.

We don’t want to do anything when the isProspect value is false i.e. when the email sender is not a prospective client. Therefore, it is best to leave that arm blank.
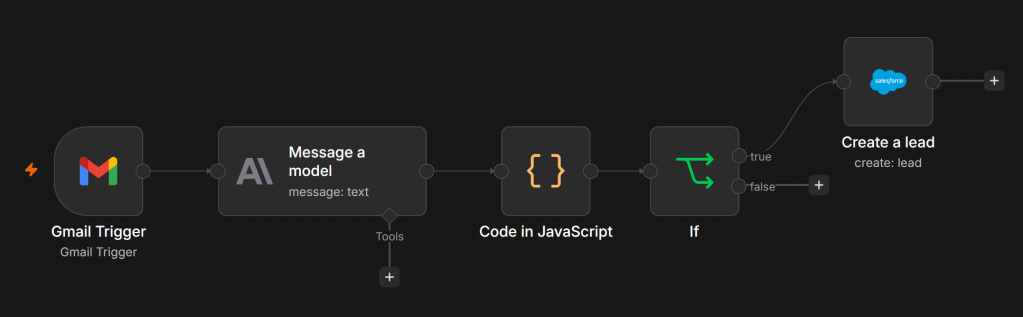
This will conclude our workflow. At the end of it all, it should look like this:
Putting the Workflow to Test
Now let’s see how our workflow performs. Consider the email below:
I want to book your Grand Canyon tour.
Best regards,
John Salesforce
This email obviously expresses intent to book a tour package i.e. isProspect should be true when you run the workflow after you receive this email or when you send an email with this content to yourself. Make sure that it is the last email you have received before executing the workflow, since the last email will be fetched by the automation. Eventually, you should end up with a JSON returned from your AI node that looks like this:
[{"isProspect": true,
"emailSummary": "The sender is interested in booking the Grand Canyon tour package.",
"firstName": "John",
"lastName": "Salesforce"}]
The isProspect value is true, so the Salesforce node runs and returns the ID of the newly created Lead. You can then find that Lead in your org.

Start Automating Your Salesforce Workflows with n8n
By combining n8n‘s visual workflow automation with Salesforce’s CRM capabilities, you can eliminate the repetitive manual work of creating Leads from incoming emails, no Apex code required. The workflow we built demonstrates how a non-developer can wire together Gmail, an LLM for intelligent sentiment analysis, and Salesforce into a seamless pipeline in a matter of minutes.
As Salesforce continues opening up its ecosystem through initiatives like Headless 360, pairing it with a flexible integration layer like n8n positions your team to move faster, reduce dependency on developers, and focus on what truly matters: converting those Leads into customers.
Thank you for reading and hope you liked this article!
Explore related content:
Exploring and Setting Up Agentforce Observability
How to Set Up Slack Record Alerts Using Salesforce Flows
Visual Comparison and Beyond – Flow Versions Just Got Easier