
Salesforce screen flows offer functionality that expedites the creation of a form: Dynamic forms for Flow, a.k.a. Fields. This functionality allows you to add fields to a form that carry over the original properties from the object. The field type, required properties, and length are automatically taken from the object to the form. Furthermore, the default value prefills the form with the prior values if the form is for an existing record.
An Example
Let’s say you want to create an opportunity form quickly for an existing opportunity record. You will get the record to have access to the field values. You can use the screen component functionality via the first tab or the fields functionality via the second.
Let’s Focus On One Field: Opportunity Name
If you add a text screen component from the first page, the component is unaware of the properties the system sets on the Opportunity name field. To start, configure each item individually. Next, set the field type by selecting the text component and then adjusting the required properties. Additionally, ensure to implement length building validation criteria along with a validation error message. The Flow will fail at the update element if this step is ignored. Opportunity name cannot be longer than 120 characters.
If you use the fields side, you can point this functionality to a record variable. In this case, you can use the record variable created as an output of the get element. You will see a list of all the fields supported on the left side of your screen. You can drag over the Opportunity name to your screen element, and all the previously mentioned manual steps are taken care of.
Let’s build the Opportunity Form together:
1️⃣ Start a New Flow
- Log in to Salesforce.
- Navigate to Setup by clicking the gear icon in the top right corner.
- Enter Flow in the Quick Find box and select Flows under the Process Automation section.
- Click the New Flow button.
- Choose Screen Flow as the flow type to interact with users through a UI, then click Create.
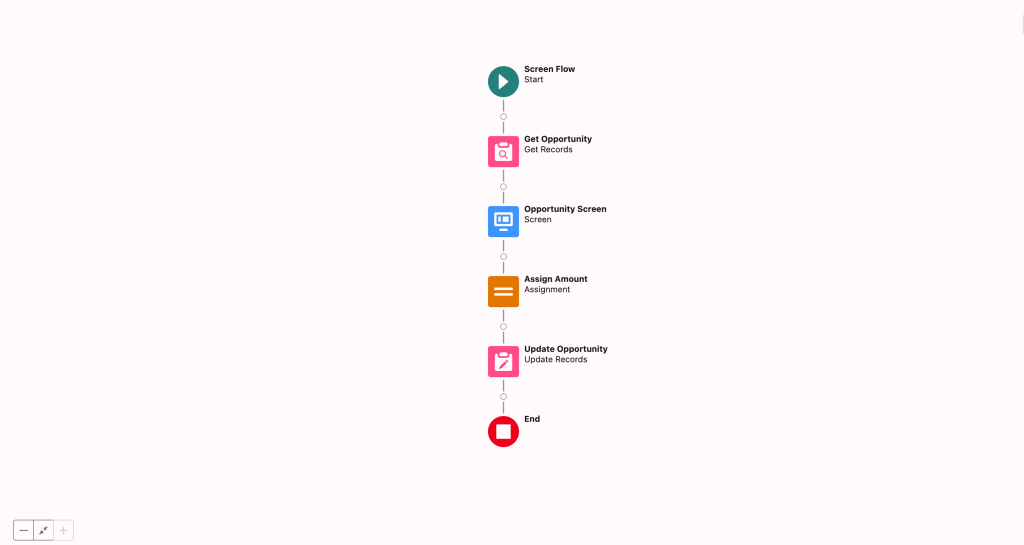
2️⃣ Get the Opportunity Record
- Add a Get element labeled Get Opportunity
- Configure the Object: Opportunity
- Set up criteria: Id = recordId (You will create this text variable under New Resource and mark it available for input). This will create a record variable {!Get_Opportunity}. If this Flow is not for an existing record, simply create a record variable using the New Resource button, skipping the creation of the recordId.
3️⃣ Configure the Screen Element
- Add a Screen element.
- Name it appropriately, like “Opportunity Form”.
4️⃣ Use the Fields Tab to Add Object Fields
- In the Screen element configuration, find the Fields tab next to the Components tab.
- Click on the Fields tab. Here, you’ll choose which record variable’s fields you want to add to your form.
- Select {!Get_Opportunity} in the picker.
- A list of available fields from the Opportunity object will appear. Select the fields you want to include by dragging them onto your form. For a simple Opportunity form, you might choose Opportunity Name, Close Date and Stage. Remember that the Amount (Currency) is not supported on the fields side currently. Go back to the components side to add a currency component. Configure amount component’s properties. Pro Tip: You can mix and match these components from both tabs.

5️⃣ Add an Update Element
- Add an Update element labeled Update Opportunity
- Make sure the first radio choice is selected under “How to Find Records to Update and Set Their Values”. Choose {!Get_Opportunity} record variable in the picker. If you use the amount field, you must add an assignment before the update element, moving the currency component value to the record variable.
6️⃣ Save, Test, and Activate Your Flow
Pro Tip: If you use picklist choices that change based on the record type used, your only option is the dynamic forms for flow functionality. Set the RecordTypeId using an assignment before the screen element, and your form’s picklists will respect this setting.
Advantages of Dynamic Forms for Flow:
- Fast to build
- Record type support for picklists
Disadvantages:
- Not every field type is supported (e.g., currency)
- Required/Not-required can not be changed. This property follows the object field property.
- Dynamic forms for Flow functionality does not support custom validation. E.g., If the Close Date is within 30 days, the stage has to be one of the two values allowed. There is a workaround.
Conclusion
You have successfully created a simple form for the Opportunity Object using the fields tab in a screen element in Salesforce Flows. This method is fast as it leverages the properties of the object fields when building the screen flow form. Use it whenever possible and mix and match it with the component functionality.
Watch my YouTube video on Fields HERE
What is Flow, Really? A Feature?
What “End of Support” Means for Your Workflows and Processes


@gatortail I love how you did this! First, you explain well. Second, you did it purely in text rather than depending on screen shots so as a screen reader user, I'm right with you. Great tip and i'm going to save this somewhere. 🙂
Remote Reply
Original Comment URL
Your Profile
Thanks, Christy; I love that you liked this. I will remember to write more clearly in the future as well.