How to Use the Action Button Component in Screen Flow

The action button component will be generally available in screen flows in the Winter 25 release. Screen actions are actions launched primarily on the current user’s browser. Now these actions can be built as an autolaunched flow and tied to an action button placed on a screen element.

“Screen Actions execute from the user’s browser, then the server. In contrast, subflows run exclusively from Salesforce’s servers” (source).
For example, Screen Actions can retrieve data while the user is on the same screen and make the data available for other components. As another example, the user can create related records using a screen action for the selected record displayed on the screen.
A popular use case is where you select an account, generate a list of contacts based on that Account (or Accounts), and then get more information about a chosen contact. You can find that example on the Salesforce Admins Blog here.
I want to show you another example where I used the action flow component to create related records.
Use Case
When products are used in a Salesforce org, users inevitably request curated screen experiences that can be built using the flow builder. The product selection screen on the Opportunity object is not easily configurable.

Let’s create a screen flow that shows all the existing Opportunity Product records (Opportunity Line Items, a.k.a. OLIs) under an Opportunity. The screen flow will then show the user all the products in the same price book with the Opportunity and allow the user to add new OLIs specifying product quantity. With action button functionality, the user can do this in a few iterations without leaving the same screen.
The action button component is relatively easy to use but requires careful preparation before the action can be tied to the screen button. You will need to build the screen action that will be executed into an autolaunched flow and activate the flow before you can use it in your screen flow.

Autolaunched Flow
For that purpose, let’s build an autolaunched flow that accepts the following inputs:
- Opportunity Id: OpportunityId
- Product Id: Product2Id
- Quantity of the product: Quantity
- Sales or Unit Price: UnitPrice

And let’s have our autolaunched flow pass back the newly created recordId for the OLI to the screen flow. I also added the fault message ($Flow.FaultMessage) output from the autolaunched flow to the output, so that I can show the message to the user if the create step fails.
This is what the autolaunched flow looks like. It is a very simple flow. It creates the OLI record and passes back the recordId to the hosting screen flow.
Screen Flow
To build the screen flow follow these steps:
- Get the OLIs on the Opportunity record sent to the screen flow as input.
2. Check via a decision whether any OLIs are found (null check).


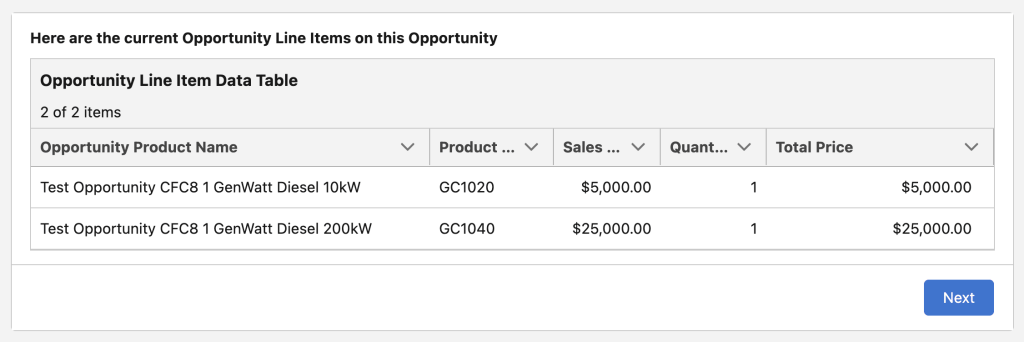
3. Display the results on a read-only datatable if there are OLIs associated with the Opportunity.
4. Build a screen showing all price book entries. Use the same price book on the Opportunity. (This flow assumes there is a price book on the Opportunity. It is a good idea to check and show a message to the user if there is none.) Allow only a single-row selection. Add a quantity number input component. You can also add read-only components that show the unit price and the total price reactively.
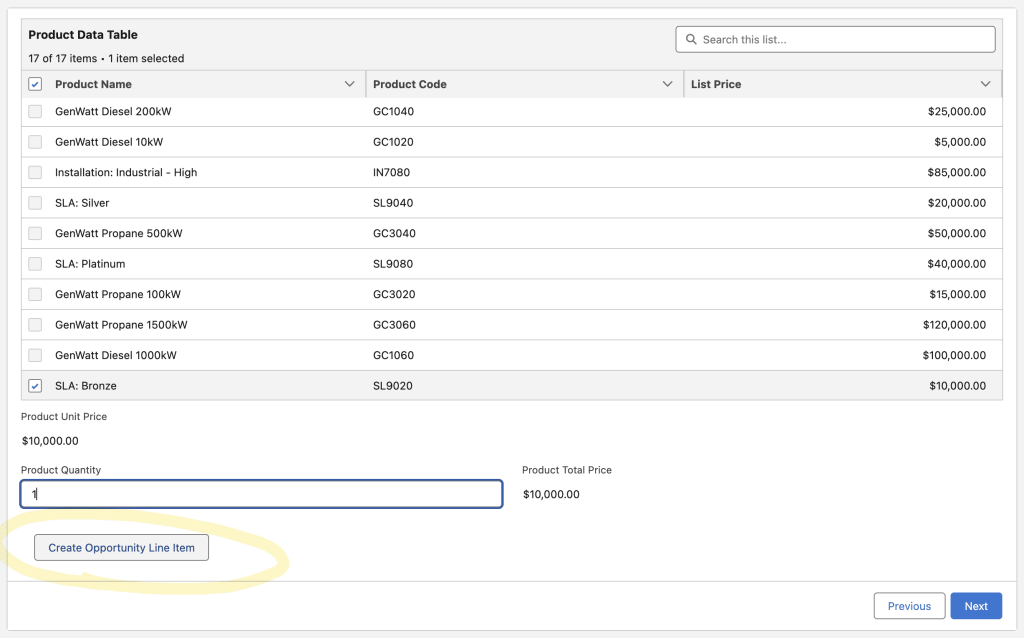
5. Add an action button linking it to the autolaunched flow you built (remember to activate the flow before this step). You can activate/deactivate this button using a formula resource that checks whether the quantity is entered correctly. Add a display text component to show the resulting OLI record Id. Remember the user can add as many OLI entries as they want staying on the same screen. The display text component will reactively refresh and show the latest OLI recordId.
6. Add the fault message received from the autolaunched flow to your display text component.
7. As the final step, add another read-only datatable showing the final list of OLIs on the Opportunity.

Considerations
This flow was designed to be used internally by logged-in users. For security and design considerations of using action button autolaunched flows, please refer to this Admins Blog post by Adam White and to the Salesforce help documentation.
When using this functionality for guest users on a digital experience site, limit the action to SOQL (Get) and ensure that input and output variables contain only the necessary information for the specific use case.
Conclusion
The action button flow component in screen flows supports enhanced functionality that extends the use cases you can build while the user stays on the same screen. It is a welcome complementary feature to reactivity in screen flows. I highly recommend that you start experimenting with this feature now that it is generally available with Winter 25 Release.
Explore related content:
Integrating the New Flow Action Button From Summer ’24
How to Use the Repeater Component in Screen Flow
One Comment