How To Attach Files Using the Flow Email Action in Salesforce


Rose Gonzales has two attached documents. If the flow is configured correctly, it will only select the document labeled final agreement and will send an email that looks like this:

Setting Up Salesforce Flow: From Pre-Release Registration to Understanding Data Structures
First off, sign up for a Spring ’25 pre-release org. Then, to activate and run the flow, make sure the admin user is added as the Default Workflow User.

Before creating the flow, it’s also important to understand that Attachments (formally known as ContentDocuments) are composed of 4 sObjects:
1️⃣ ContentDocument: Appears as a file or attachment in the user interface. It is a junction object that holds metadata for the document.
2️⃣ ContentDocumentLink: Appears as Shared With in the user interface. It includes a LinkedEntityId (the Ids of a user who can read/edit the document or the Id of a parent record) and a ContentDocumentId (the Id of the document itself).
3️⃣ ContentVersion: Appears as Version in the user interface. It is the actual file (.docx, .png, etc). Every time an old version of a file is replaced with a new version, a new ContentVersion is created.
4️⃣ EntitySubscription: Appears as a Follower in the user interface. Created when users follow the document in Chatter.
How To Attach Files Using the Flow Email Action in Salesforce:
1. Create a Schedule-Triggered flow
The Start element should be configured to select the Contact object and include a condition where Final_Agreement_Sent__c equals false. It’s important to note that ContentDocuments and ContentVersions are unable to trigger Record-Triggered flows. To dispatch an email upon the creation or editing of an attachment, an Apex trigger would be required.
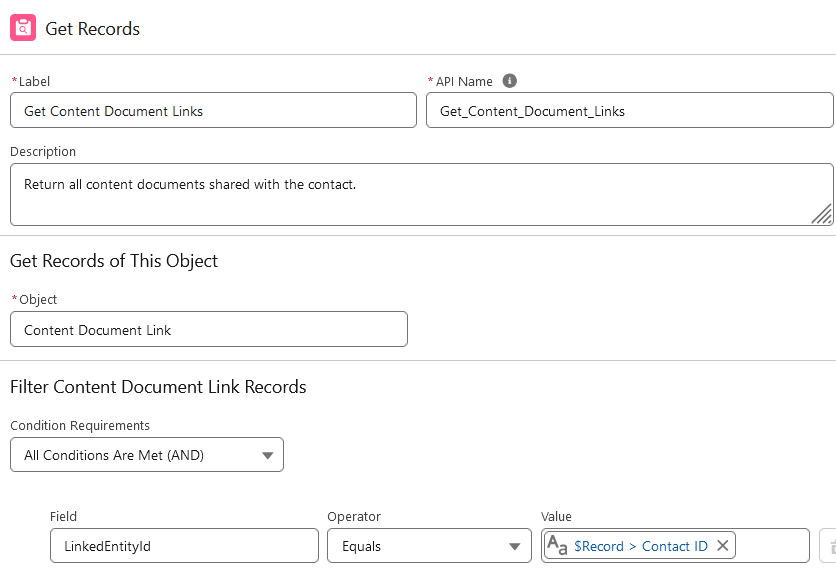
2. Add a Get Records element named “Get Content Document Links”
Get all Content Document Links whose LinkedEntityId matches {$Record.Id}.
3. Create a Collection of the ContentDocument Ids
Use a Transform Element to assign each ContentDocumentId to a text collection variable.

4. Filter to first ‘Final Agreement’
The Ids of all ContentDocuments have been retrieved. The next step is to filter these to only include documents titled “Final Agreement.” Utilize a Get Records element to search for a document whose Id is in {!Create_Content_Document_Id_List} and whose Title contains “Final Agreement.” Ensure that you select only the first matching record.
5. Create a decision element which tests to see if {!Get_Content_Document.Id} is blank is True
If the result is true, the flow should end since GetContentDocuments returned no records.
6. Add a Get Records element to the Default Outcome
The get records element gets a ContentVersion whose Id equals {!Get_Content_Document.Id}. Sort the results by Descending CreatedDate to ensure that only the first record that meets these conditions is returned.
7. Send the email
Create a text template with merge fields to personalize the message. Then, set the Attachment ID in the email action, to {!Get_Content_Version.Id}.

8. Use an Update Records element to set the value of Final Agreement Sent to true

The final Flow:

Conclusion
The continuous improvements to the Simple Email action in Salesforce not only enhance its functionality but also significantly reduce the complexity and cost associated with third-party email services. These advancements are particularly beneficial for small businesses and nonprofits seeking integrated, cost-effective solutions. By utilizing these features, organizations can improve their operational efficiency and communication effectiveness, indicating a promising future where Salesforce could potentially replace conventional email platforms with its integrated solutions. This enhancement aligns with Salesforce’s commitment to providing comprehensive and user-friendly solutions that cater to the evolving needs of its diverse user base.
Explore related content:
Create Document Zip Archives in Salesforce Flow
Top 7 Salesforce Spring 25 Flow Features
Gear Up for TrailblazerDX ’25: Registration is Open!

One Comment