
Should You Use Roll Back Records in Salesforce Screen Flows?


If you have ever built a complex Salesforce Screen Flow, you have likely run into this classic dilemma: Your user completes Step 1, clicks Next, and the Flow creates an Opportunity or an Account. But then, on Step 2, they hit an unexpected error, or worse, they simply close the browser tab.

Suddenly, you are left with orphan records or half-baked data cluttering your database.
Historically, fixing this required complex workarounds, such as building custom logic to manually delete created records if a subsequent step failed. But with Salesforce’s Roll Back Records element, you can hit the undo button on database changes automatically.
The question is: Should you use it in every Screen Flow?
Let’s dive into how it works, when it shines, and the critical edge cases you need to watch out for.
What is the Roll Back Records Element?
The Roll Back Records element gives admins transactional control over their Flows. It undoes DML operations, such as Create, Update, or Delete, made earlier in that transaction.

Think of it as an insurance policy. If a sequence of events cannot be completed perfectly from start to finish, the Roll Back element ensures the database reverts to exactly how it looked before the Flow started. No half-finished updates, no orphan records, no data debt.
The Golden Use Cases for Screen Flows
Screen Flows are uniquely vulnerable to partial data execution because they inherently invite human interaction. Here are the top scenarios where dragging a Roll Back Records element onto your canvas is an absolute must:
The Multi-Step Wizard with Dependencies
Imagine a Screen Flow where a user fills out a form to create a new Account, clicks Next, and is then prompted to add a Contact and an Opportunity. If the Account is successfully created, but the user gets a validation error on the Opportunity screen and abandons the Flow, you now have an Account floating around with no Contact and no pipeline.
By routing fault paths from your later screens and elements to a Roll Back Records element, you ensure that if the whole process can’t finish, none of it does.
Handling Complex Fault Paths Safely
We all know we should use Fault paths on our Data elements to give users a clean error message instead of an unhelpful unhandled fault screen. However, if your Flow has already executed a Create Records element before hitting that fault, showing a pretty error message doesn’t change the fact that data was already committed.
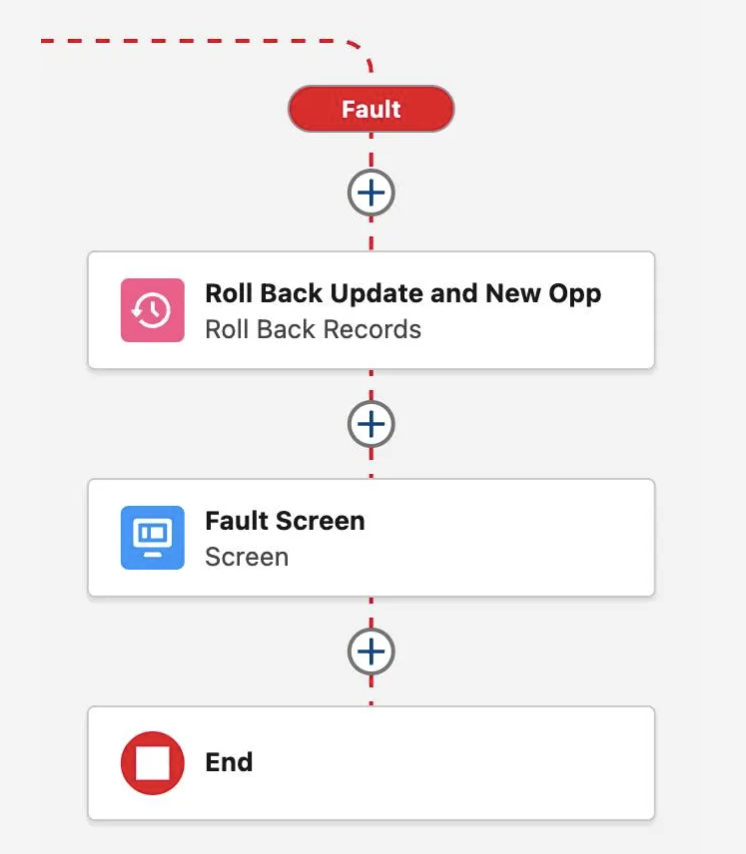
A standard best-practice pattern for advanced error handling looks like this:
- A data element fails.
- The Flow triggers the Fault Path.
- The Flow hits the Roll Back Records element to clean the database.
- The Flow routes to a final Screen displaying a user-friendly error message explaining what went wrong.
Why should you always place your Roll Back Records element before the fault screen? Because if the user does not click next on the fault screen the roll back records would never execute if the elements are sequenced that way.
The Catch: Why You Can’t Use It Everywhere
While it sounds like a magic eraser, the Roll Back Records element has distinct guardrails. You cannot blindly add it to every Flow without understanding how Salesforce manages transactions.
The Realities of Flow Transaction Boundaries
What trips many admins up is understanding what actually constitutes a transaction boundary. In a Screen Flow, a transaction commits data every time the user hits a Screen, Pause, or Local Action. For example, if your Flow creates an Account record, then shows Screen 2, that Account is committed. If the Flow later fails updating a Contact and triggers Roll Back Records, the Account stays committed.
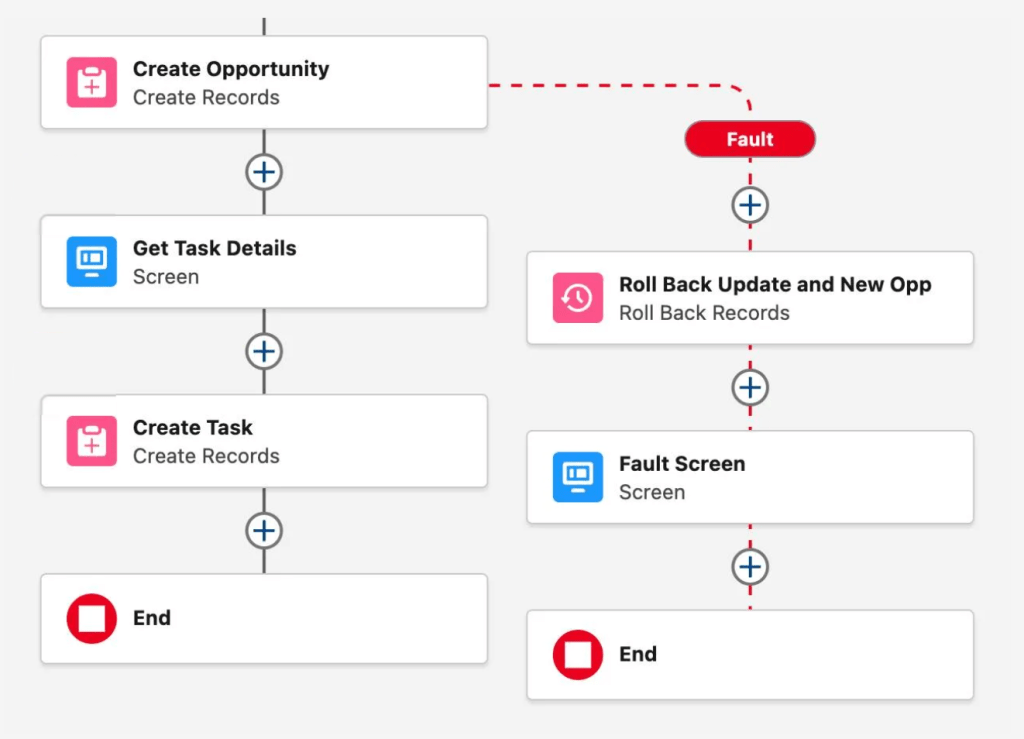
The rollback element can only undo uncommitted data changes within the current transaction. To make a rollback effective across multi-page forms, you must design your Flow to collect all user inputs across your screens first, and execute your DML elements sequentially at the very end of the Flow.
The Screen Component Blindspot
A Roll Back element reverts database changes, but it cannot revert user inputs on screen components or undo external system actions.
If your Flow executes an Apex Action or an HTTP Callout that sends data to an external ERP or billing system before hitting a Roll Back element, the Salesforce records will revert, but that external system will still have the data. External callouts cannot be rolled back by a Salesforce element.
The All or Nothing Rule
Roll Back Records is an uncompromising element. It rolls back all database changes made in the current transaction. You cannot tell it to roll back the Opportunity update, but keep the Account creation. If you need partial rollback capability, you have to architect your Flow carefully and handle all scenarios manually.
Best Practices for Salesforce Admins
If you are ready to start implementing Roll Back Records on Salesforce Break, keep these foundational rules in mind:
- Always end with a Screen: A Roll Back Records element is an end-state element; it terminates the transaction. However, you can route the path from the Roll Back element to a Screen component afterward. Always do this so the user understands that their changes were not saved and they need to try again.
- Keep transactions in mind: Remember that a Flow transaction pauses at a Screen element. If your Flow creates a record, passes a screen, creates another record, and then rolls back, it will roll back across those screen boundaries as long as it is part of the same overall Flow execution.
- Don’t substitute it for good validation: Roll Back elements are meant to handle unexpected system faults or user drop-offs. They should not replace standard validation rules or clear UI guidance that prevents bad data from being entered in the first place.
Put Roll Back Records to Work
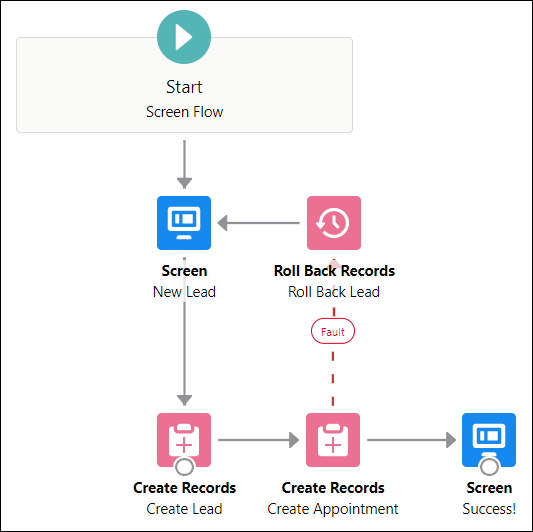
Should you use Roll Back Records in Screen Flows? Absolutely, but selectively.
For simple, single-screen Flows that update a single record, it is usually overkill. But for complex, multi-step wizards, junctions, or any Flow where a partial finish creates a data integrity nightmare, the Roll Back Records element is one of the most powerful tools in your admin toolkit.
Picture a multi-step wizard that collects a lead, then books an appointment. If the appointment creation fails, Roll Back Records undoes the lead creation too. The user simply starts over with a clean slate.
The Roll Back element can save you from writing complex cleanup automation and keeps your Salesforce org pristine.
Explore related content:
Salesforce Flow Best Practices
Open a Page Action: Redirect Users After a Screen Flow
Unleashing the Power of Editable Data Tables in Salesforce Screen Flows
The Ultimate Guide to the Salesforce Screen Flow File Preview Component