Transform Element and HTTP Callout for Random Test Data

When creating apps, it’s crucial to test them thoroughly to ensure they work properly. A key part of testing involves using a large test data set that can cover all the scenarios the code is built to handle. It is better to use random fake data known as mock test data for this stage of development. This process helps find and solve problems before your Salesforce solution is released to the public. Think of it as a rehearsal that helps make the final performance smooth and error-free. By testing with this fake random data, developers can make sure the software can handle different situations and fix any hidden issues. Read this post to learn how you randomize your Salesforce Org data for testing by leveraging a free API that produces random user/contact test data.

After you build and deploy this flow solution, you will be able to set the checkbox fields on contact records for these contacts to be updated with random test data.
How Does It Work
The process works as follows:
- You set the is_test__c checkbox to true on a single record or multiple records.
- A record-triggered flow is launched. The flow uses a subflow to execute most of the critical process logic under an async path (the use of a subflow is not required).
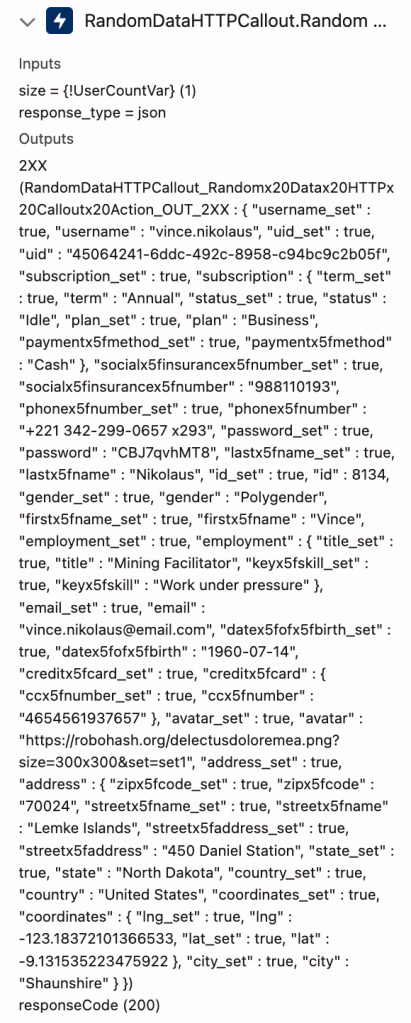
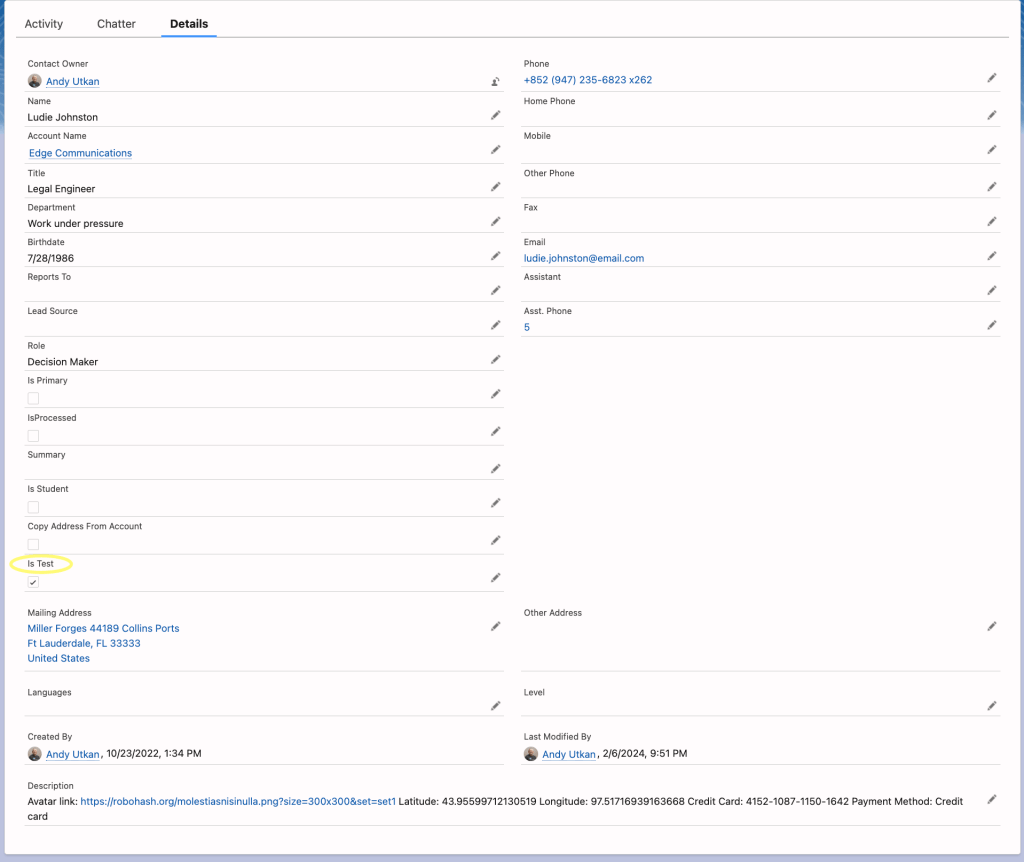
- The subflow calls the free Random Data API using an HTTP Callout. The results are processed using the transform element to assign the relevant values to contact fields. Necessary formula transformations are executed during the process: The two lines of street address coming from the API are concatenated into one field. The contact record is updated, and you will have brand new random name and address field values in your contact records, once the solution executes.
Here is how you set up your flow:
- Set up your External and Named Credentials
- Build the HTTP Callout Action
- Build the Transform Element
- Finish the flows, debug, and execute
And naturally, test, deploy, and execute your solution.
Let’s dive into these steps:

Set up your External and Named Credentials
Create an External Credential as seen below.

Here is the secret to getting this to work. Your external credential requires a principal to be visible from a permission set, although your API does not need it. I created one and typed “Hello” in it. Don’t ask me why this is needed, because I don’t know. See how I have done it in the screenshot below. I thank @joshdayment for his tip on this step.

Create a Named Credential by entering the Random API URL. This configuration will be linked to the external credential you have created in the previous step. The URL:
https://random-data-api.com/api/v2/users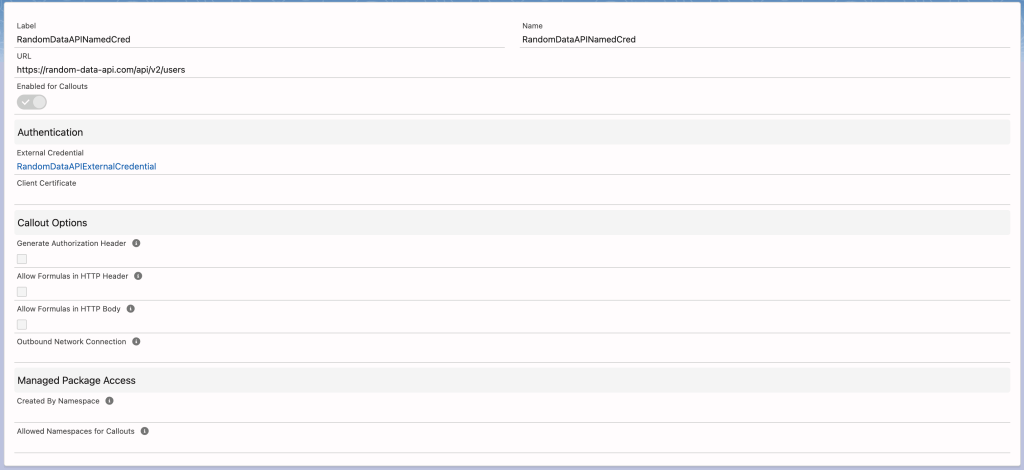
Create a permission set and assign your user this permission set. The permission set needs the “RandomDataAPIExternalCredential – Hello” added under the External Credential Principal Access section.
Build the HTTP Callout Action
You will build a flow solution that triggers an HTTP Callout. I used a subflow that I called from a record-triggered async path, but the use of subfow is not required. You can build everything in the record-triggered flow.
Create an autolaunched flow that will serve as the subflow. Your subflow needs to accept a contact record variable as input. It will pass the contact record variable as output once it is done.
Go to add action element and click on the HTTP Callout button on the left bottom of that modal window. Point your HTTP Callout to the Named Credential you have created. You will use the get method. Configure two parameters for input into the callout: Response type and number of users we want the API to generate the data for. Have the configuration process fetch the sample data and automatically configure the response format. You can hardcode the parameters into the HTTP callout as “json” and “1” respectively. We will ask for one contact/user data at a time. The use of a variable as seen in the picture below is not necessary.

Build the transform element. Map the response to the contact record variable fields.
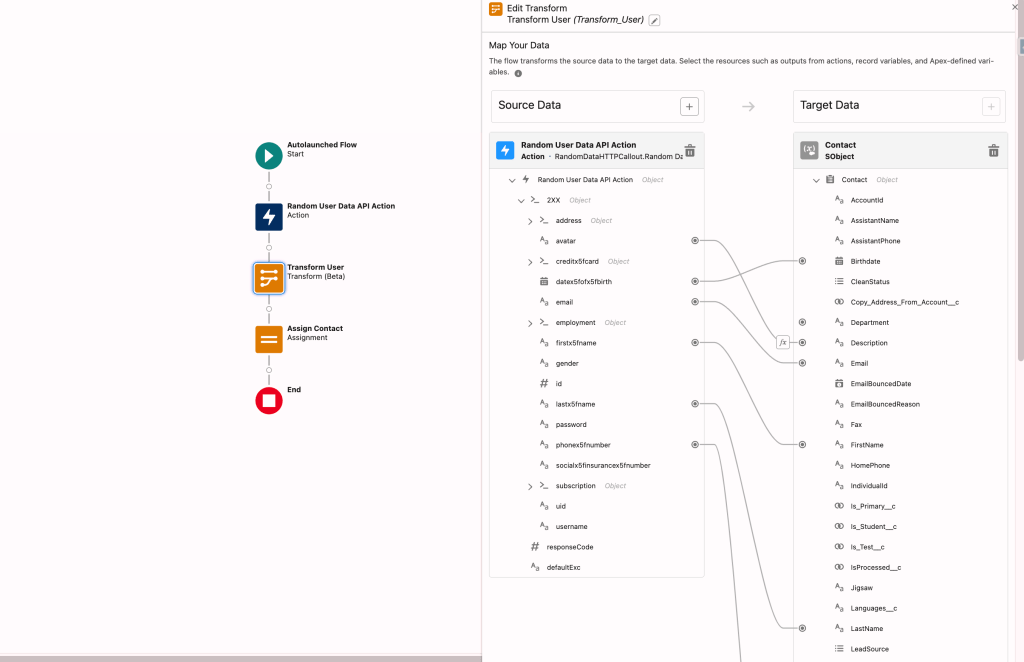
I used two formulas in my mapping. One that concatenates the two street address values from the API into the single Street Address field, and another one that combines many interesting fields to update the description field of the contact record. Here is the formula for the first item:
{!Random_User_Data_API_Action.2XX.address.streetx5fname}&" "&{!Random_User_Data_API_Action.2XX.address.streetx5faddress}Build as many formulas as necessary. Create custom fields for the API data you find interesting, and want to capture in separate fields.
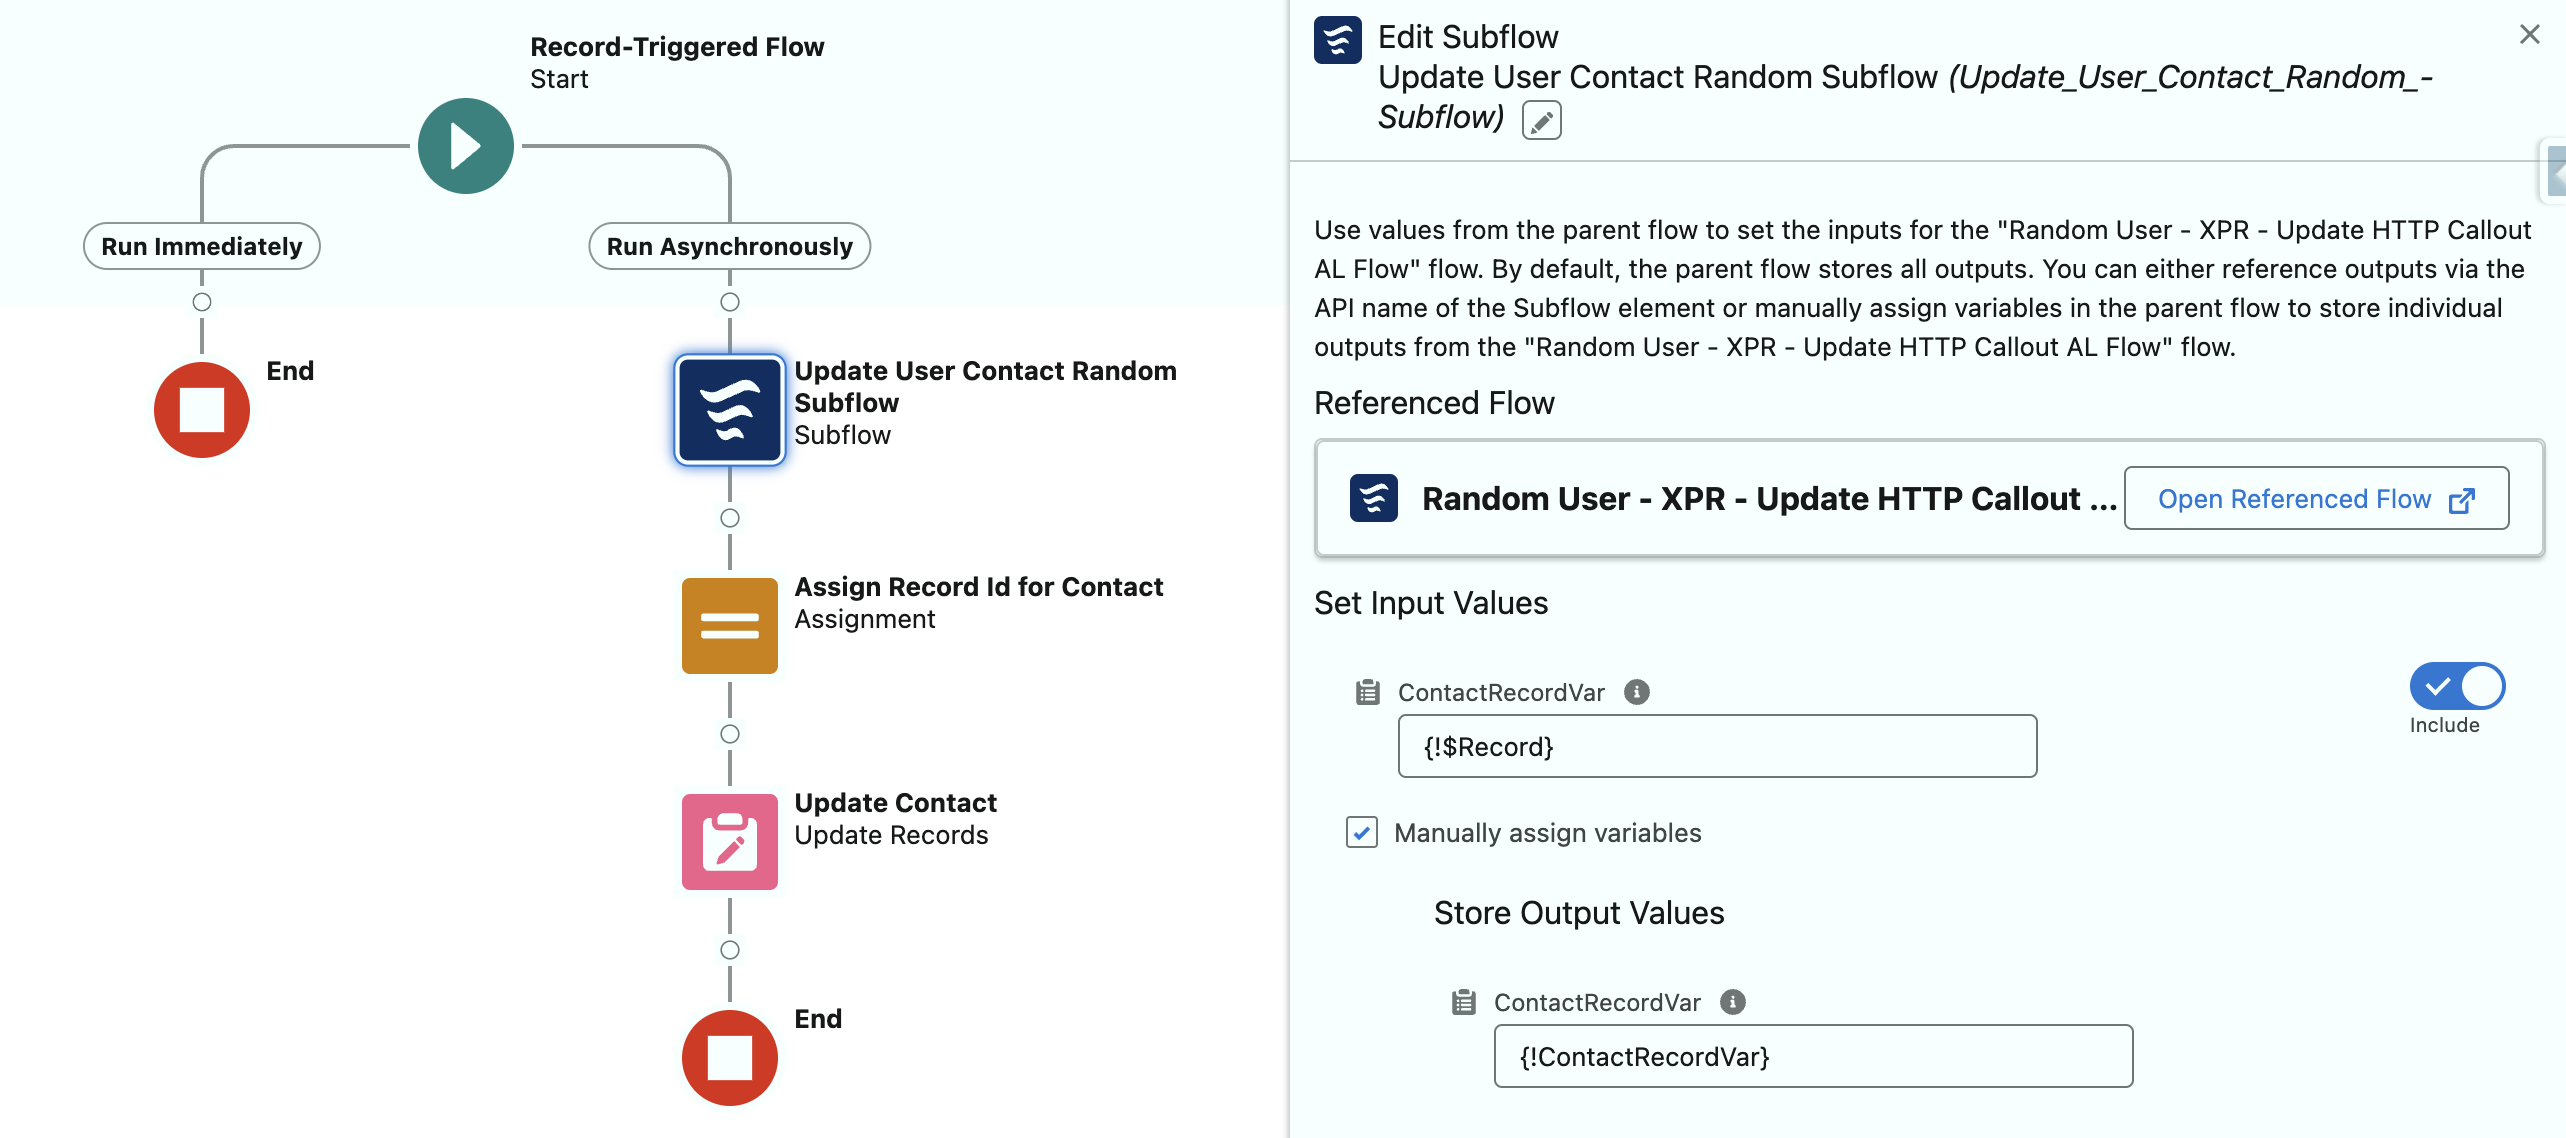
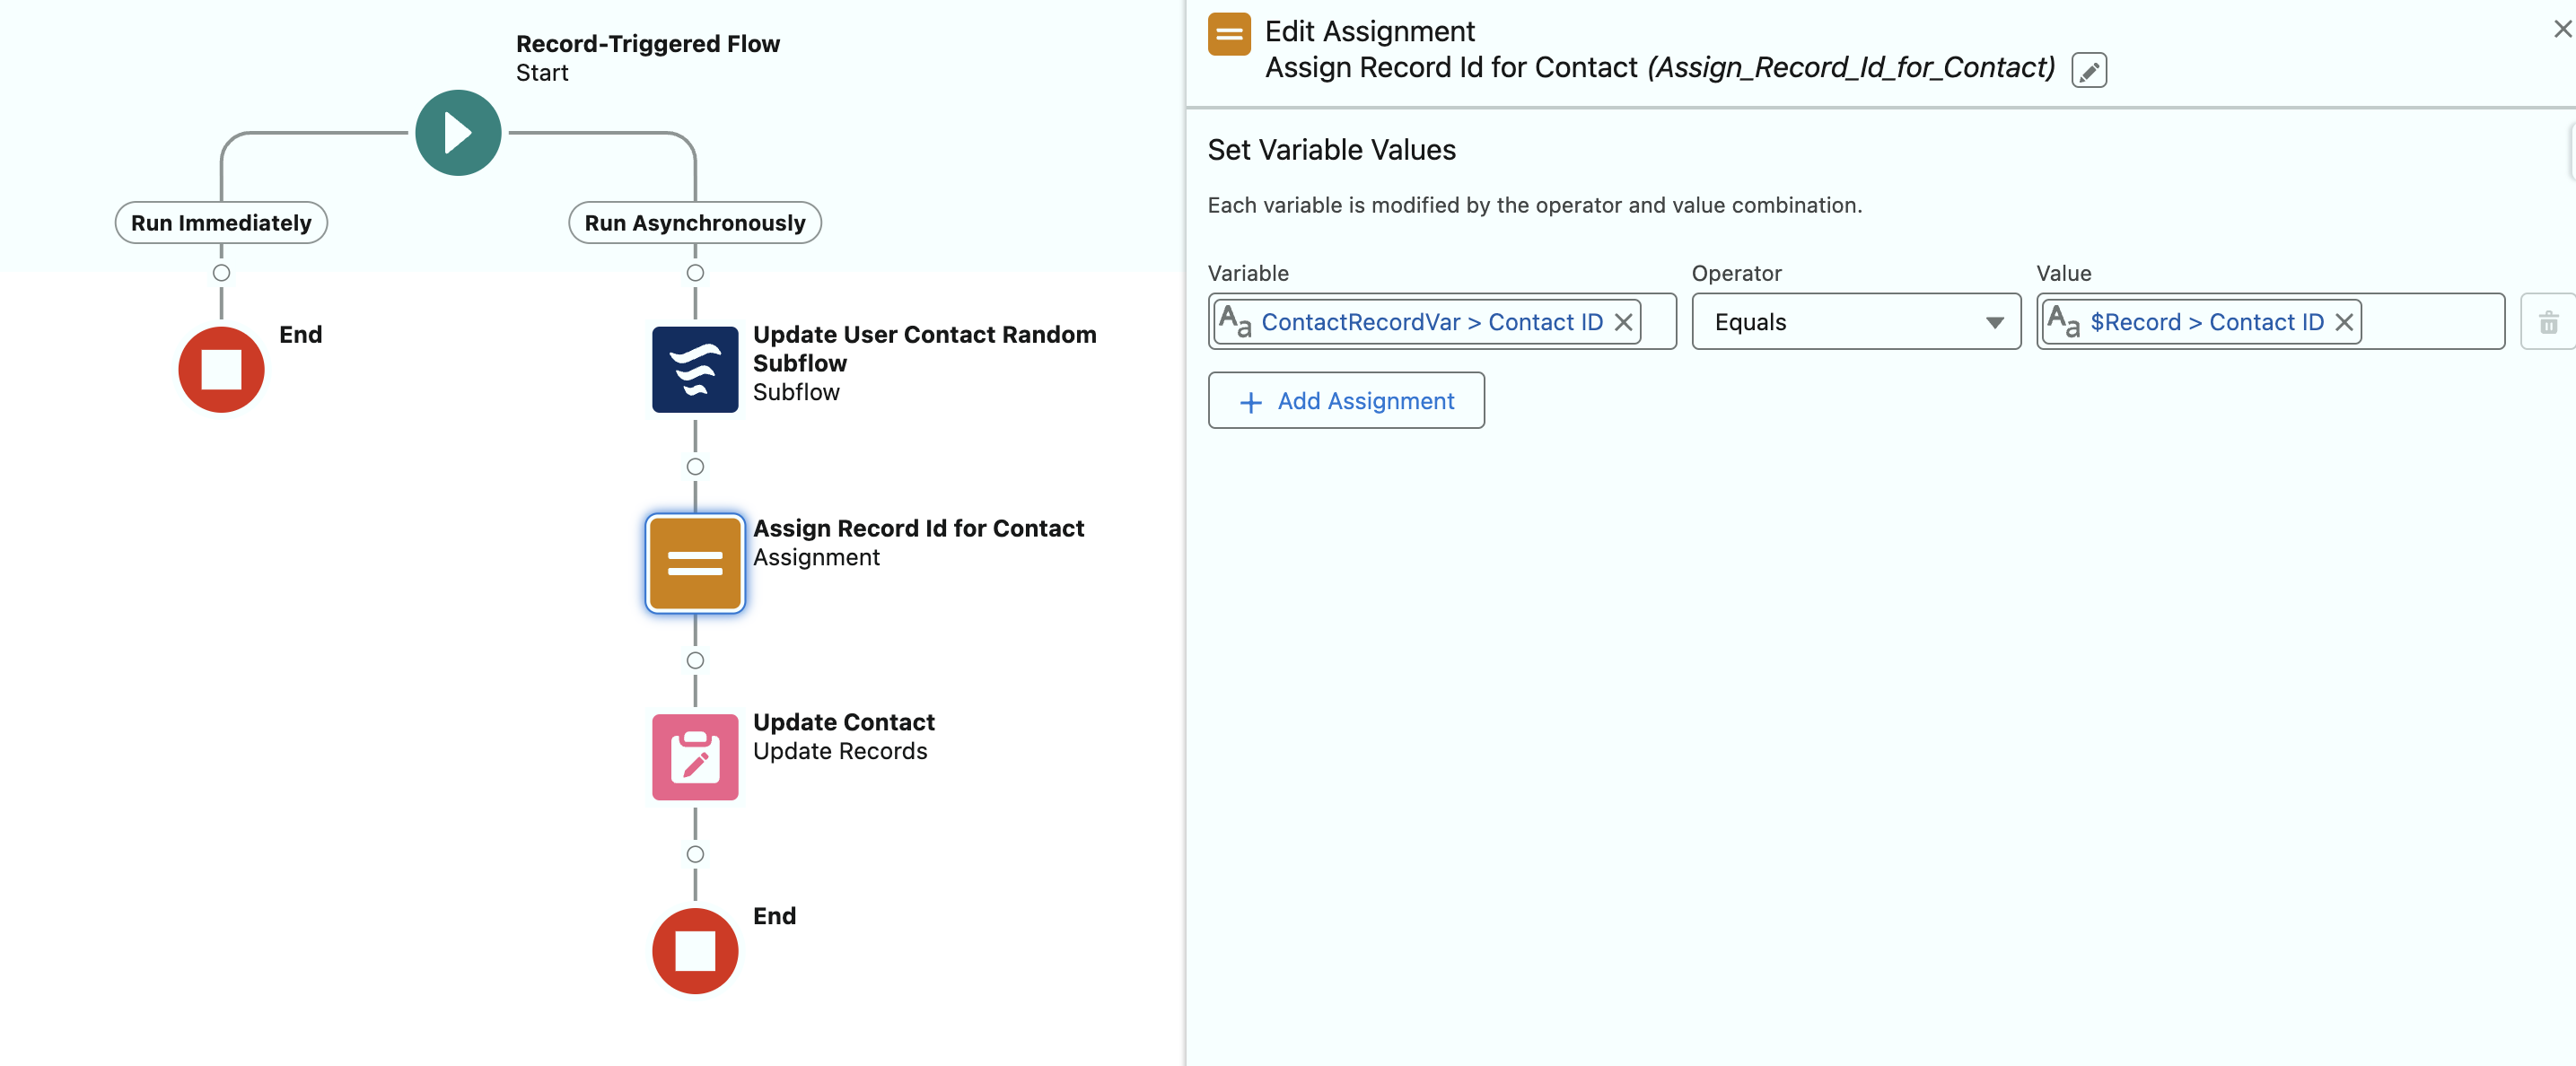
Now add an assignment as seen below.

Finish the flows, debug, and execute
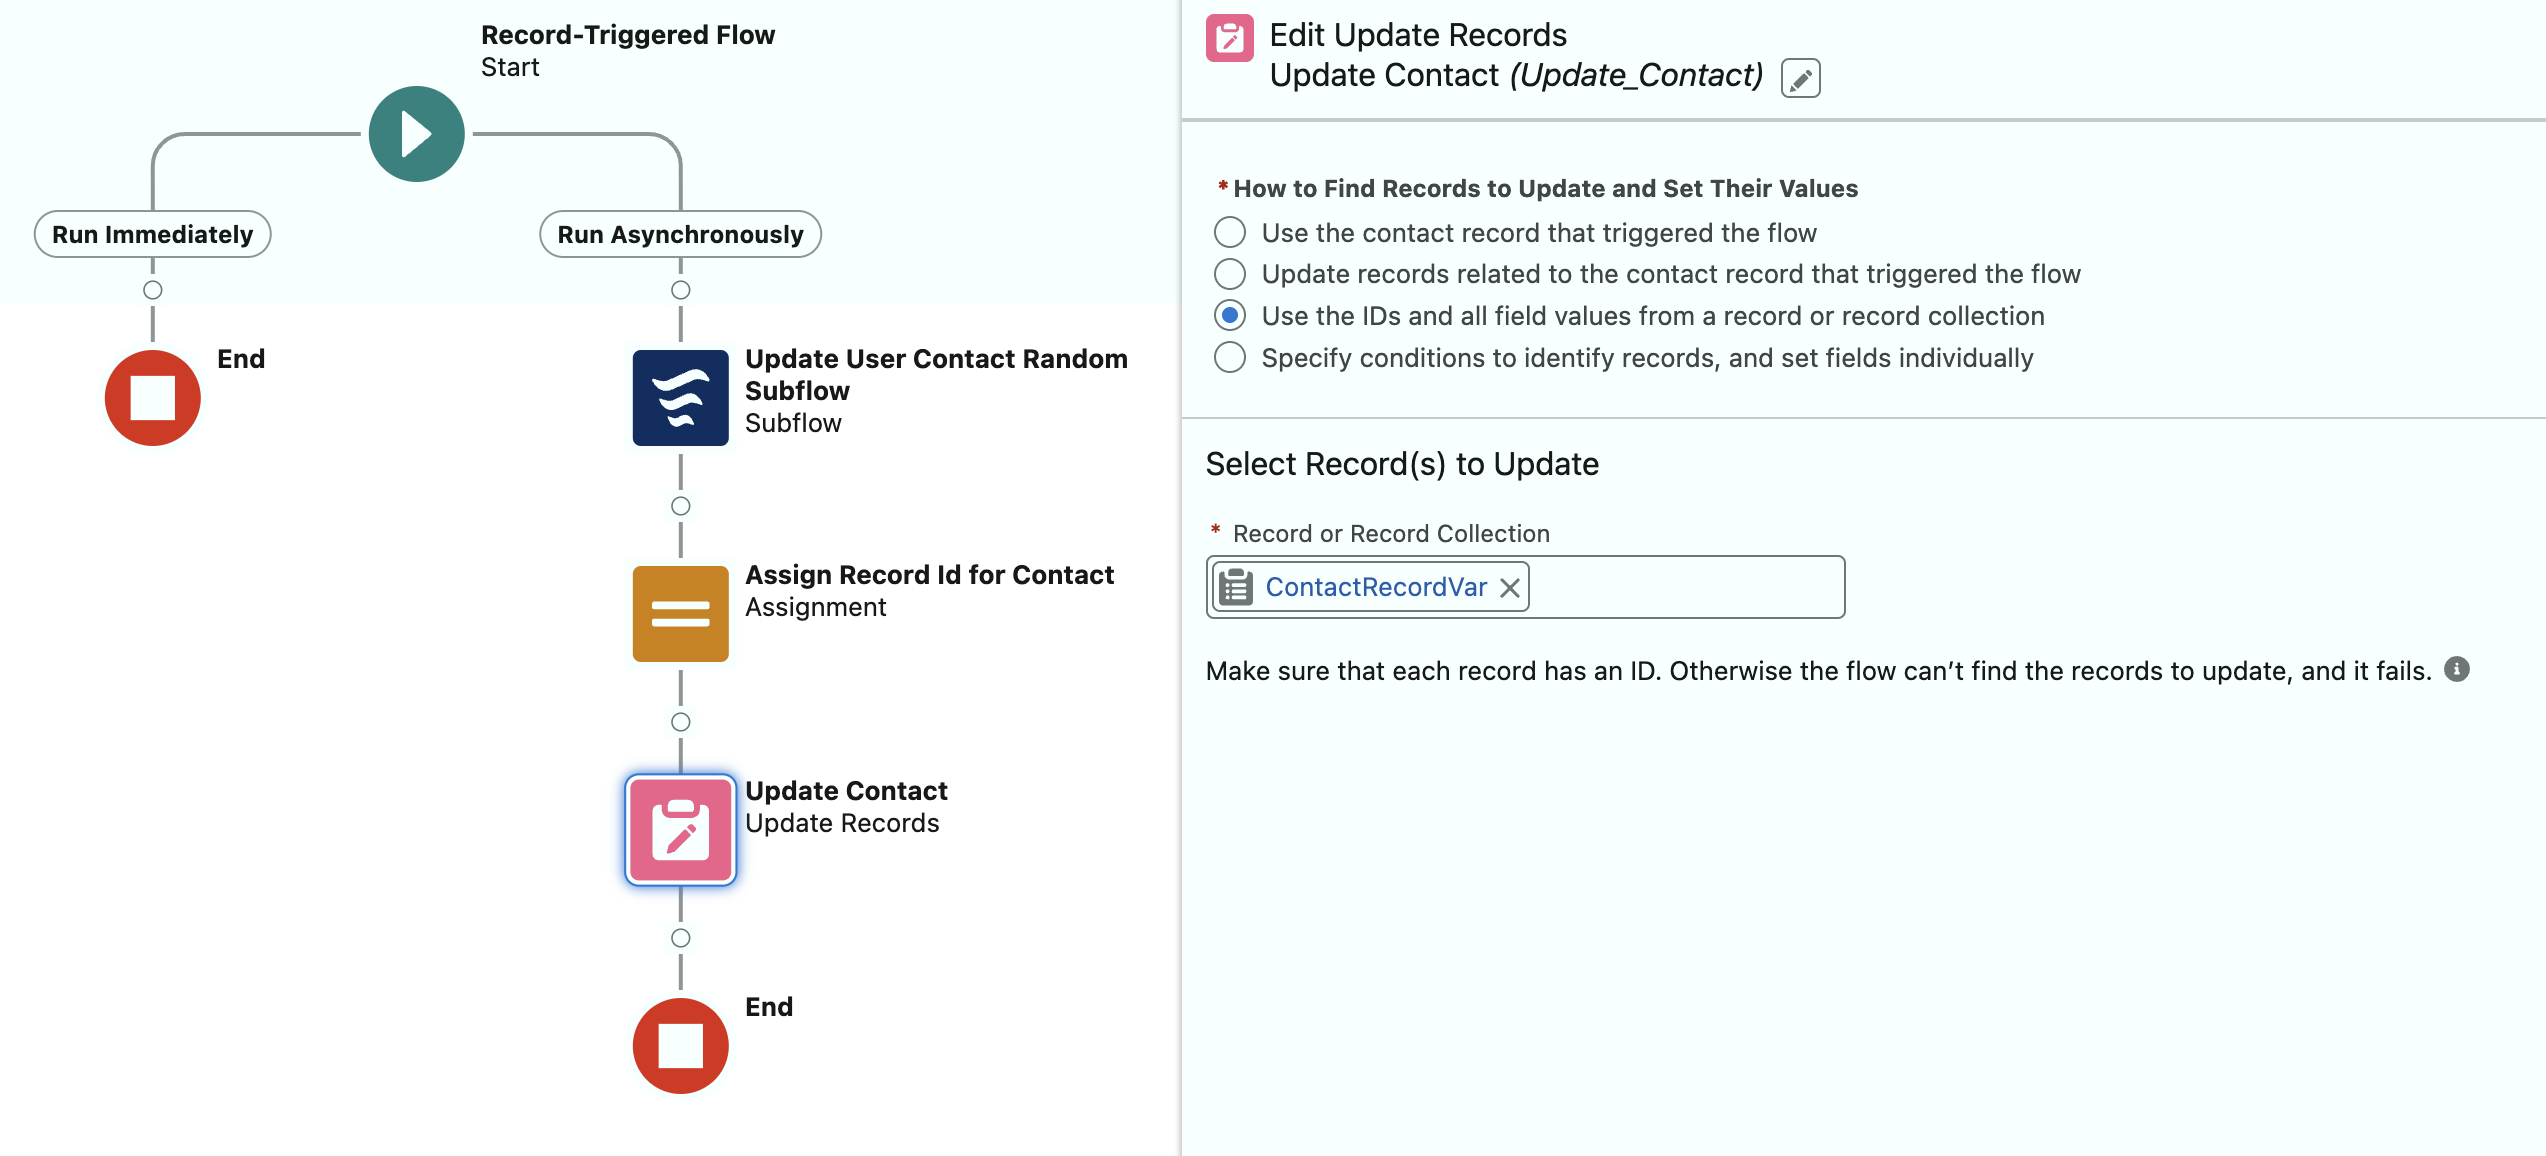
Your record-triggered flow will look as seen in the screenshots below (click on the image to see a bigger version).
Here are a few points to remember:
- Your HTTP callout needs to be under an async path.
- When the record variable for the contact comes back from the subflow, the Id value is wiped out. I added an assignment to add the $Record.Id value back into the record variable. The Id is required for the update element.
- My solution does not change the contact field values the transform element does not have mappings for. You can set yours up to wipe out all other field values.
Here are a few additional screenshots from the debug run that show the results (click on the image to see a bigger version). By using this flow you can test your Salesforce solution by resetting your contact record field values to random name and address values as many times as you need.

Conclusion
Wrapping up, this post has walked you through the essential steps and innovative strategies for effectively testing your Salesforce applications using mock test data. By leveraging the free Random Data API to inject random user and contact data into your Salesforce Org, we’ve demonstrated a method that not only enhances testing accuracy but also prepares your Salesforce solutions for real-world scenarios. Remember, thorough testing is the cornerstone of deploying error-free and reliable applications. As you embark on this journey, don’t hesitate to experiment, learn, and apply these practices to ensure your Salesforce solutions stand the test of user expectations and system demands. You can watch the solution demo video on the Salesforce Break YouTube channel to see the solution in action. 👇
Enjoy.
Read more on HTTP Callouts:
Shorten URLs using the HTTP Callout Post Method
Note: Transform element functionality is currently in beta (February 18, 2024).

This is great blog post! Really a nice way to get acquainted with http callouts. I managed to create a working flow with this example.
Thanks, Bart. I am happy you were able to build yours.
Thanks, Bart. I am happy you liked it.