
How to Convert a Lead Using Salesforce MCP


Recently, Salesforce has been making big strides in AI automation and integration including its new framework called Headless 360, which allows AI agents and agentic workflows to access and do user-authorized changes on Salesforce orgs. Users can prompt their agents to create, update and delete records, run Flows and Apex processes and so much more. With the core paradigm of Salesforce, and the tech world at large, shifting from deterministic development to agentic solutions, it is now time to consider using AI models for our daily Salesforce tasks as well.

Due to the rapidly shifting nature of this space, a Salesforce admin, developer or user must be ready to adapt, which means to effectively hand over the daily time consuming tasks to AI’s figurative hands. It helps to start small and build intuition with a task most Salesforce users already know by heart: converting a Lead.
Converting Salesforce Leads with Headless 360 & MCPs
We will try to convert a Lead through the use of MCPs presented to us by Salesforce as part of their Headless 360 push. MCP stands for Model Context Protocol, an open standard created by Anthropic in November 2024 to connect AI models safely to external data sources and tools (our Salesforce org in our case). An MCP server works as an interface between the data source and the AI model; it translates the data that the source or the tool provides into a language that the AI model can read and perceive. Luckily for us, basic access to Salesforce MCP servers is free, though usage may consume Flex Credits and therefore be billed.
We will then make Claude act as the intermediary between our requests and Salesforce applications i.e. we will ask Claude to convert our Lead. We can use any AI model we want (ChatGPT, DeepSeek etc.), but Claude is subjectively the easiest to use, and Salesforce itself has already been working together with Claude.
How to Set Up a Salesforce MCP Server in Setup
Navigate to Setup → MCP Servers. You will find a bunch of default MCP servers that Salesforce has already built.


For the purposes of this article, we will build one from scratch. Press the “Add MCP Server” button on the upper right corner and pick the “Create Salesforce MCP Server” option. Assign the names of your choice and click Create.

Navigate to the Tools tab at the top to see what your MCP can currently do, which is (unsurprisingly) nothing. If you try to add a tool, you will not see anything different either unless you have already built custom tools beforehand. There is simply not an MCP tool that will help us convert a Lead. Therefore, we will have to build one from scratch; essentially, we will build an Apex class that takes the Lead we want as a parameter and uses the Database.convertLead() method on it.
Why Lead Conversion in Salesforce Requires Custom Apex MCP Tools
You might be wondering why we have to write Apex code and present it as an MCP tool if all we want to do is to convert a Lead i.e. tick the isConverted flag and create new Account, Contact and Opportunity records. After all, Lead conversion is a well hidden set of compound DML statements, therefore the SObject Mutations MCP should be well equipped to take care of it, right?
Unfortunately, this assumption is not correct. Lead conversion is not a compound DML statement in disguise. It is a distinct platform operation with no DML equivalent. Database.convertLead()resolves record matching against existing Accounts and Contacts. It applies configured Lead Field Mappings and reparents related Activities, Notes, and Cases, and also fires conversion-specific automation atomically as a single guaranteed unit. This avoids stitching together and manually rolling back individual statements.
Handing this to a generic SObject Mutations MCP means reimplementing complex core logic. You would also have to sync every admin’s mapping and deduplication rule changes manually. Salesforce already maintains all of this logic for us. That’s why conversion needs its own purpose-built Apex action rather than a general-purpose DML tool.
Building the Invocable Apex Class for Salesforce MCP Integration
Open your IDE of choice and create the Apex class that you will be using for this application. This Apex class needs:
- the global or public access modifier, since we want our method to be accessible from outside
- a method annotated with @InvocableMethod along with its variables annotated with @InvocableVariable. The MCP invocation of a method works similarly to how Flows invoke Apex methods.
Defining Invocable Variables for the Lead Conversion Method
There are three parameters we need: the ID of the Lead we want to convert, a flag to store whether we want to create a new Opportunity or not, and the name of the new Opportunity if we want a new one. All of them will have to be annotated with @InvocableVariable.
global class ConvertLeadRequest {

	@InvocableVariable(Label = 'Lead Id' Required = true)
	public String leadId;

	@InvocableVariable(Label = 'Create Opportunity' Required = true)
	public Boolean createOpp;

	@InvocableVariable(Label = 'Opportunity Name' Required = false)
	public String oppName;

}
Implementing the Invocable Apex Logic
Our method, which will have to work with MCPs, needs to be annotated with @InvocableMethod and take List as its parameter. First, it will fetch the Leads with the given IDs, which usually consists of only one Lead ID. It will then check their respective Company fields and fetch the Accounts based on those Company values. If it finds a match, it will need to attach the newly created Contact to the existing Account that matches. Otherwise, it will create a new Account. It will also take our parameters createOpp and oppName into consideration during conversion to a new Opportunity. All things considered, our method will look like this:
@InvocableMethod(
        Label = 'Convert Lead'
        Description = 'Converts a Lead'
        Callout = false
)
global static void convertLead(List<ConvertLeadRequest> requests) {
    System.debug('ConvertLeadInvocable.convertLead start');
    List<Boolean> isSuccessful = new List<Boolean>();

    Set<Id> leadSet = new Set<Id>();
    for (ConvertLeadRequest clr : requests) {
        leadSet.add(clr.leadId);
    }

    Map<Id, Lead> leadMap = new Map<Id, Lead>([
            SELECT Id, Name, Company
            FROM Lead
            WHERE Id IN :leadSet
    ]);

    Set<String> accountSet = new Set<String>();
    for (Lead ld : leadMap.values()) {
        accountSet.add(ld.Company);
    }

    Map<String, Account> accountMap = new Map<String, Account>([
            SELECT Id, Name
            FROM Account
            WHERE Name IN :accountSet
    ]);

    System.debug('accountMap: ' + accountMap);

    List<Database.LeadConvert> leadContexts = new List<Database.LeadConvert>();
    for (ConvertLeadRequest clr : requests) {
        Lead leadTemp = leadMap.get(clr.leadId);

        Database.LeadConvert lc = new Database.LeadConvert();
        lc.setLeadId(clr.leadId);
        lc.setConvertedStatus(LEAD_CONVERSION_STATUS);
        lc.setDoNotCreateOpportunity(!clr.createOpp);
        lc.setOpportunityName(clr.oppName);
        lc.setBypassAccountDedupeCheck(false);
        lc.setBypassContactDedupeCheck(false);

        Account companyTemp = accountMap.get(leadTemp.Company);
        if (companyTemp != null && companyTemp.Id != null) {
            System.debug('Found a company for ' + leadTemp.Name + ': ' + companyTemp.Id);
            lc.setAccountId(companyTemp.Id);
        }

        leadContexts.add(lc);
    }

    System.debug('leadContexts: ' + leadContexts);
    List<Database.LeadConvertResult> results = Database.convertLead(leadContexts, true);
    // allOrNothing is set as true so that the agent will return an error in case of failure

    for (Database.LeadConvertResult res : results) {
        if (!res.isSuccess()) {
            System.debug('Conversion failed: ' + String.valueOf(res.getErrors()));
        }
        isSuccessful.add(res.isSuccess());
    }

    System.debug('ConvertLeadInvocable.convertLead end');
}
You may have noticed the variable named LEAD_CONVERSION_STATUS. This is intentionally left there — you can replace it with the customized Lead Converted status on your org or assign it as a static variable in class context, above the method.
global static final String LEAD_CONVERSION_STATUS = 'Closed - Converted';It’s also worth noting that Lead conversion will fail if the Lead is owned by a queue. Therefore, if your org can have such a case, it is worth running the setOwnerId(Id) method when values are being set for the Database.LeadConvert object.
This will take care of the Apex side of our mechanism. However, our work on Salesforce is not done; our MCP is still not capable of using the method we just built, we need to introduce it manually.
(In a production environment, our Apex class would have to be accompanied by a test class, which is out of our scope for this article)
Adding Your Invocable Apex Action to the Salesforce MCP Server
Go back to Setup → MCP Servers and navigate to the MCP server mentioned. Click the Add Server Assets button and pick the “Add Tools” option. You should be able to see the method there. Click the Add Tool button and then click Save.

Since our conversion method works with Lead IDs, we also need our MCP to run SOQL queries to fetch those IDs when the name of a Lead is given. Hence, we should also add the SOQL tool. Click the Add Server Assets button and pick the “Add from Server” option. Go to the SObject All MCP server and pick the Query Records (SOQL) tool. Click Done.
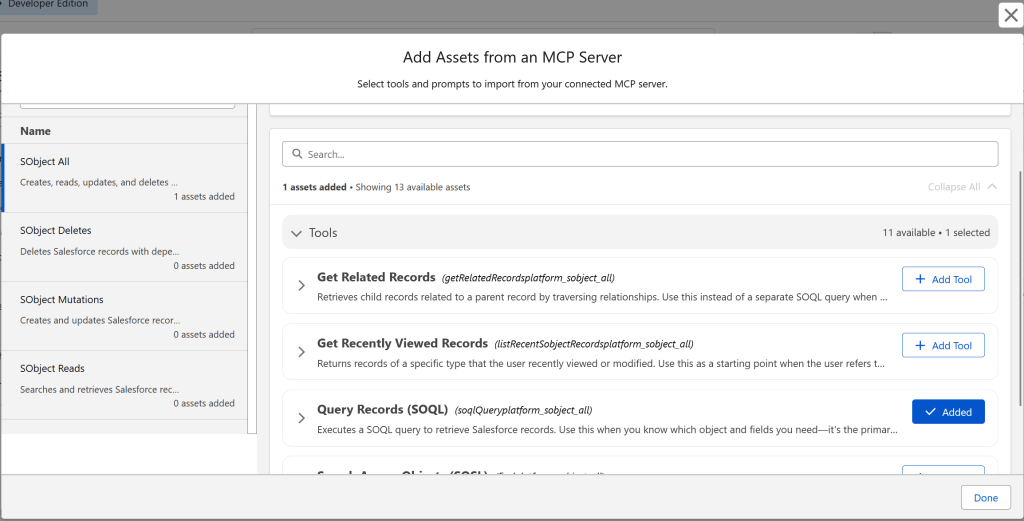
Finally, activate your MCP through the Activate button on the top right.

We have now successfully introduced our method to the MCP and are now halfway there towards our three-way party.
How to Connect Claude Desktop to Salesforce via MCP
Now, let us move to the other side of the equation: the AI agent. To connect our Salesforce org with our agent, we need to introduce our MCP to the model. We will use Salesforce’s External Client App functionality for this integration.
Before doing so, we need to configure our OAuth settings. Navigate to Setup → OAuth and OpenID Connect Settings and enable Require Proof Key for Code Exchange (PKCE) Extension for Supported Authorization Flows. This strengthens our org’s OAuth configuration and allows Claude to connect successfully.
Next, open your Claude client and navigate to Settings → Connectors. Click Add in the top-right corner to create a custom connector. As of September 2026, Claude does not offer an out-of-the-box Salesforce connector. The setup screen will ask for a name and your MCP server URL, which you can find under your MCP details. Choose a name that clearly distinguishes this connector from your others, then paste your MCP URL into the appropriate field.

Configuring Salesforce OAuth for Claude
If the connector setup also asks you for a Client ID and Client Secret, or if you are receiving an error with the reference code “ofid_e99841b04f01022e” after creating your connector, go to Setup → External Client App Manager. Create a new External Client App and give it a name of your choosing. Make sure that:
- the Enable OAuth checkbox is checked
- selected OAuth scopes include Access Salesforce hosted MCP servers (mcp_api) and Perform requests at any time (refresh_token, offline_access)
- Require secret for Web Server Flow and Require secret for Refresh Token Flow are unchecked under the Security subsection
- Require Proof Key for Code Exchange (PKCE) extension for Supported Authorization Flows is checked
- Issue JSON Web Token (JWT)-based access tokens for named users is checked
Go to the Tools tab and then the OAuth Settings section of the External Client App. Click the Consumer Key and Secret button. Verify yourself when prompted, and copy the Consumer Key and Secret. Paste them to the input boxes on the Claude client.
If you are not prompted for a Client ID and Client Secret, you can skip to the part ahead.
Completing Claude Authentication and MCP Connection
You will then be asked to self-authenticate, both on Claude and on Salesforce. Do both, and if everything goes smoothly, your MCP will be connected.
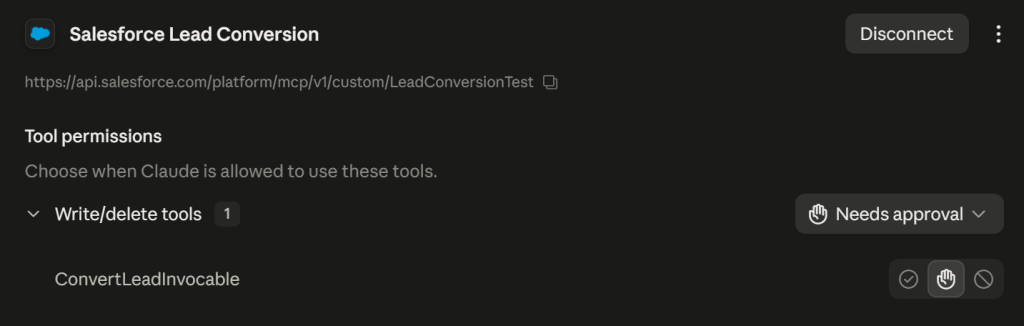
Now let’s put our code to test by converting a Lead of our choosing. I will convert Mike Braund from the standard Salesforce record data that is present on all Developer Edition orgs (hence no distinguishing PII is given below).

Testing the Lead Conversion Prompt in Claude
We will try to convert our Lead with a simple prompt: “Convert the lead named "Mike Braund" on my Salesforce org. Make sure that the opportunity name is "Mike Braund 2026"“. This way we will also test if Claude can fetch the parameters it has been given and assign them accordingly.
To achieve its task, Claude will occasionally ask for permissions. Make sure to give them to it by pressing any option that starts with “Allow”. The screenshot below notifies us that Claude is ready to run our Apex method.

Once all necessary permissions are given, and all tasks are done, Claude will notify you that the task is completed successfully. It will even run a second SOQL query to ensure that the IsConverted flag of the Lead is checked.
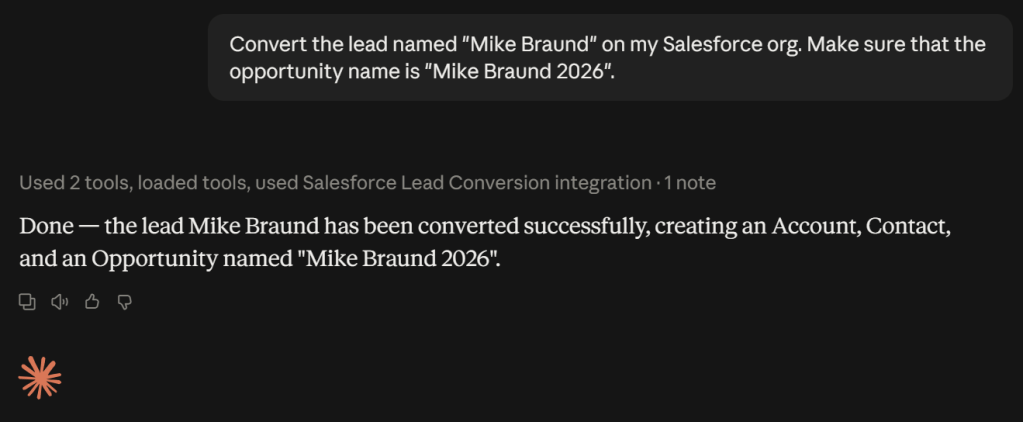
Claude isn’t lying. If we navigate to the page of Mike Braund on our org, we will see that the Lead is converted successfully; there is now a Contact in its place which is linked to a new Account and an Opportunity.
Therefore, our experiment is successful; we can now do one of our most basic tasks through our AI agents instead of clicking, effectively saving time which can then be spent on actually getting the Leads that are to be converted.
Start Automating Your Salesforce Workflows with AI Agents Today
AI agents are becoming smarter and more capable with every passing day. Salesforce users and developers should hand repetitive, time-consuming tasks over to these AI tools. Developers must ensure these tools support people rather than replace their jobs. The goal is to help people work more efficiently and with less effort. A good approach is to start small and build confidence with familiar, repetitive Salesforce tasks.
Explore related content:
AIforce: Salesforce’s New AI Interface Layer for Slack, Claude, and Lightning
Agentforce Agent Flow Action Best Practices
Accounts and Contacts in Salesforce: The Foundation Every Admin Needs to Get Right


Nice example. In a real org I would be careful about matching the Account on the Company text alone, since “Acme Inc” and “Acme, Inc.” will create a second account. Passing an explicit account ID, or checking the org’s duplicate rules first, avoids that. Reading the converted status from LeadStatus where IsConverted is true, instead of hardcoding it, also saves a failure the day an admin renames the status.
You’re right on both fronts, though I find it unnecessary to waste a SOQL query just to get the Lead Converted status value while the Lead conversion process rarely changes for an average company, if at all. It could be better practice to store it under a custom label and then update it periodically with asynchronous Apex should it change frequently.